 Textaizer -
Help Textaizer -
Help |
Textaizer -
Help
7. Videaizer
THIS FEATURE HAS BEEN REMOVED FROM VERSION 7 AND WILL NO LONGER BE
OFFERED BY DEFAULT. Make Text Video clips from video
clips Limitations of
Videaizer How does it
work? Note: users who have VLC
player installed do NOT necessarily have the DivX, Xvid, H.264 etc.
codes on their systems. They must be installed separately and need to be
present in the windows system directory. The videaizer
interface The Videaizer has an extended interface. The area for the other
functions is now fully taken for the video controls, the video windows and the
codecs. On the right still the familiar control tabs are found. On the top-right
a miniature picture is seen from the video source. This picture is one of the
frames of the source video, and can be used to test the effect on the
settings. Video
sources
Users who still wish to keep uning it are requested to
contact APP Helmond and ask for a version that allow for Video creation (using
the FFMPEG DLLs, so fully YouTube
ready).
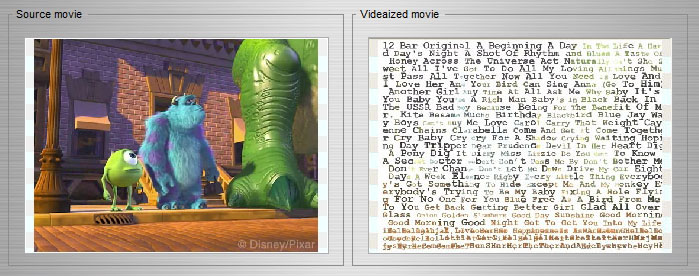
With Videaizer you can create animated text art. You'll
need a source video clip, load it in the program, and create text art from each
individual bitmap of the video sequence.
Textaizer and the
'plug-in' Videaizer work together. The Videaizer decomposes the source video
clip ('footage') into individual pictures. Textaizer then takes each of
these pictures to create a text art picture. Each resulting bitmap is then
used to build the video clip from these new pictures. The input video clip can
be of multiple kind, and except for High Density (HD) footage, almost every
codec can be used, as long as the codec is available in the windows system.
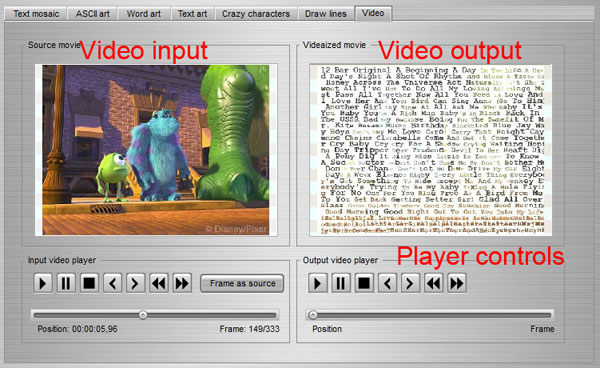
Workflow: Player Control
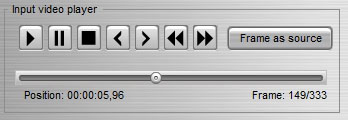
Each video window has
its own player control. There are buttons for (left to right): play - pause - stop - 1 frame left - 1 frame right - 10 frames
left - 10 frames right. The slider below the controls
both indicate the current position in the movie; and as a quick way to move to a
certain position in the movie. Simply grab the green indicator and drag the
slider to the wanted position. The Position info
follows the format 'hh:mm:ss,fraction of a second',
the Frame indicator shows the current frame and the
total amount of frames.
Work flow: Type of artistic output
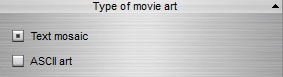
There are two possible types of movie art: Text Mosaic and ASCII
Art. Both are controlled with their respective controls are descibed here and here. Please assure that when the controls for the
settings are selected because the Start button
also changes function when a different art creator is
selected. You need to click on the Video tab again to assign the Videaizer to
the Start button.
Media info and settings
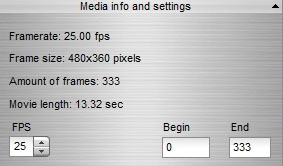
When a source movie has been
opened, the resume of the movie is summarized here.
NOTE: If no source movie is loaded prior to starting the 'Videaizer', it will take the current still picture and use that for each frame. The size of the video is the same as the original size of the source picture. So be careful what you are doing... a large picture/video size may freeze your system. This feature is not well tested, and might contain some unexpected issues. If so, please contact APP Helmond.
Create and save a Videaized movie
First select the proper codec into which the movie needs to be transformed. A
codec is the compressor of the movie sequence. Uncompressed movie takes several
Gb, compressed can be a factor of 25 smaller. For example: one frame of 720x576
is 1.19 Mb uncompressed, and 25 frames per second equals almost 30 Mb/s, so one
minute equals 1.8 GB. In contrast: a good quality DVD stream can be 0.9 Mb/s in
size, so 100 Mb for 2 minutes. The choice of codec depends on the availability
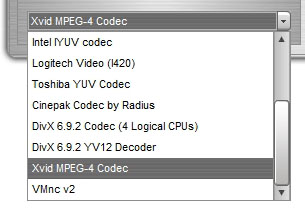
of the codec on the computer system. The available
codecs are shown in the box
(see picture below), the selected codec is indicated above this box.
Warning: the list of available codecs also include
those only for playback, and not for recording. You
have to manually find what the codec is capable of. There is no guideline
for this (unfortunately).
When all is set, and the Start button shows the text 'Start Videaizing'. Press the Start button and watch the progress roll on. In case you wish to abort the creation (slow, not the right range), press the Cancel button. The resulting video file is now shown, but only what has been processed so far. This video is temporarily stored. To save the file, use the menu: 'Videaizer' 'Save videaized movie'.
FX data points
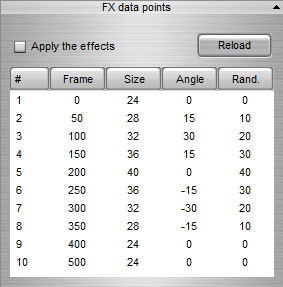
The Videaizer has a built-in special effects generator. This generator replaces the static settings of the Text Mosaic and ASCII Art settings. There are three types of dynamic effects. With each frame these settings can be changed:
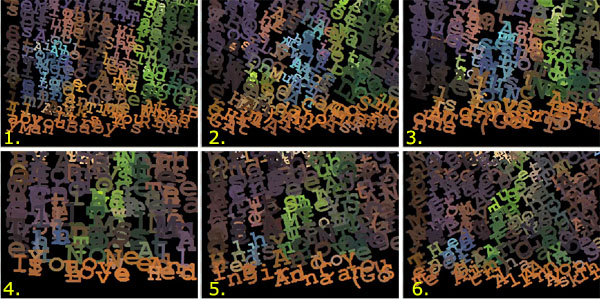
In the picture below an example of these dynamics is shown. The numbers correspond with the key frames of the input file (the example of the data set is shown below the picture, only the first 6 from 9 data sets are shown).
To apply the effects the user has to prepare a special effects input file. This file can be prepared in Notepad as a normal text file. The effects can be turned on and off using the check box 'Apply the effects'. For easy tuning, use Notepad to change the parameters in the input FX (text) file, and press the 'Reload' button to update the data.
This file has a specific structure. Deviating from the predefined structure will result in error messages. The structure is (example):
1, 0, 24, 0, 0
2, 15, 38, 45, 10
3, 45, 62, 90, 20
4, 90, 126, 90, 30
5, 135, 90, 180, 40
6, 180, 36, 200, 30
7, 235, 12, 270, 20
8, 270, 24, 300, 10
9, 350, 24, 180, 0
Videaizer uses the concept of Key frames: frames that have pre-defined values. The values between two key frames are interpolated. This ASCII file has the following structure:
The effects file is opened via the menu: 'Videaizer'
'Load FX file'. This file must be an ASCII file of type ANSI. It is
recommended to use the file extension 'txt' to
easily edit this file in e.g. Notepad.
After loading the file, an echo of the
data is shown in the table. This table cannot be edited (use the Notepad
file-edit instead).
Some tips for a proper FX handling:
 ) and
Open Type Fonts (
) and
Open Type Fonts ( ) can be
rotated.
) can be
rotated.