Legoaizer -
Help Legoaizer -
Help |
Legoaizer -
Help
Functions
These
functions are only
shows when a button on the left of the GUI is pressed. A dedicated window is
now opened with a certain set of features, settings, checkboxes, etc. Each time a
new function-set is selected this pop-up window is refreshed with the new
functions. There can be only one of these windows open. Mosaic
size Picture
above: the mosaic size pop-up window.
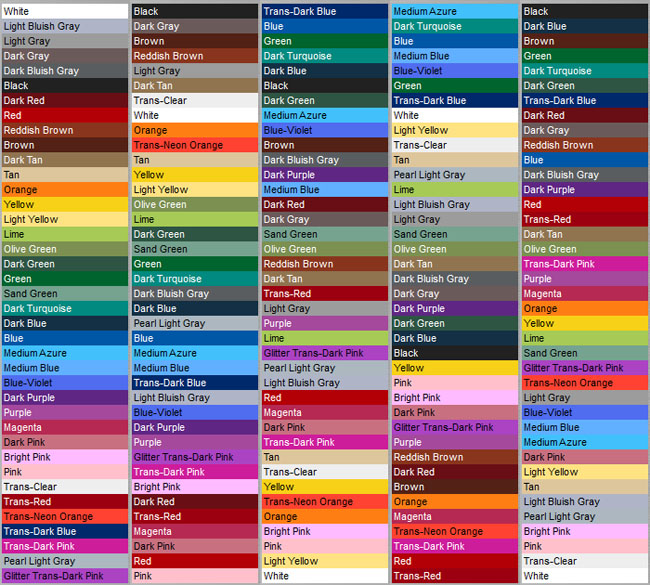
The following functions are available: Colour
matching Picture
above: the colour matching size pop-up window.
The following functions are available:
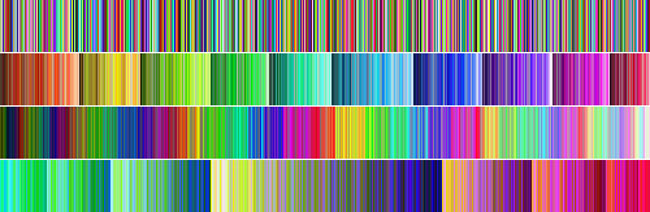
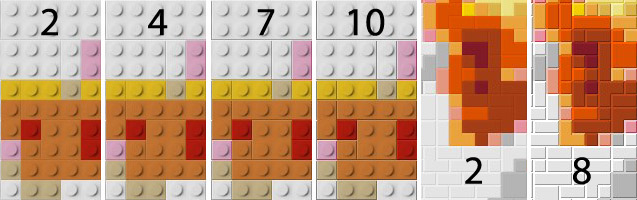
Picture above:
the 5 colour sorting options.
From left to right: Original sequence (actually following Bricklink sequence),
Hue, Windows RGB and Perceptive, Alphabetical. Because the sorting is not easy to explain in the
example above, we also show the result from a series of 500 random colours,
sorted according to the first 4 methods: From top to bottom: original (random), Hue,
Windows RGB and Perceptive. Colour
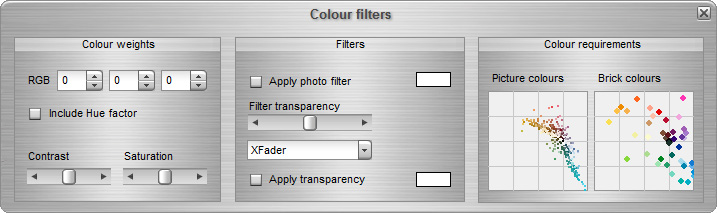
filters Picture above: the colour correction filters and colour overview pop-up window.
The following functions are available: The filters van
be used for several purposes: to correct a colour cast of the source picture, or
to make the colour more crisp, or to emphasize a certain colour, e.g.
'gold' Ministeck® mosaics (some colours are very suitable to create
warm-gold mosaics). The two example pictures below show some of the effects that
can be made. Example picture 1: the photo
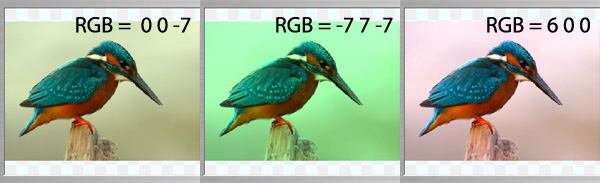
filters and their transparency settings Example picture 2: the RGB
filters for several different settings Ministeck settings Picture above: the
Ministeck® price & mosaic rendering settings pop-up window.
The following functions are available: Bead options The beads
colour settings are simple (left part
of the above picture): indicate wich combination of colour set is required,
then press the 'Update colour set' button. The current colour set is
immediately replaced with the new selection. The new selection is only temporary, and
when closing the application this selection is not remembered. Be careful: not-stored
changes in the old set are discarded when changing the colour
set for beads this way. On the
right side a different feature
is shown: using shaped pegboards. These pegboards are pre-installed, and should not
be removed from your system (they will be removed however when you uninstall
Legoaizer). To make a pegboard active, check the 'Apply
pegboard' option, and
select one of the boards in the miniature viewer. Then create the mosaic. The
output picture is complete, but the excel spreadsheet is not suitable for
building. You should use the 'Special printing' pdf-printing get a good building
map for colours, positions and amounts per colour.
This output applies the peg-board settings to visualise each bead (in the GUI
and in print), but in some cases the peg size is too large or
small, showing a pegboard mosaic result where the beads seems too large or small to
fit onto the shaped pegboard. The 'Peg size correction' can change this:
a positive value will make each bead larger in the print-out, while a negative
value will decrease the bead shape (but only in the interface and the 'Special printing' blueprint). This tweaking parameter is
only useful for making the result look more realistic, and has no
effect on the bead mosaic creation. Finally, the 'Paint tube' icon in the middle opens a dedicated
window in the interface to actually 'goo' and draw with a pencil/brush. Since
this feature requires quite some explanation, this is described in detail in the
tutorial on pegboards (link), and therefore not
explained in this paragraph. Picture
above: the preferences pop-up window.
The following functions are available: 3D options
are used for simulating 'real' bricks
in the blueprint output. When no library of photographs is used for bricks, the entire mosaic is computer generated, where the brick colour is taken from
the colour sets, and the 3D stud is created by overlaying a real built-in
picture a of a brick stud. The top and bottom shades are also computer
generated. When this option is checked, the studs are used for the mosaic end
result in the viewer. The
save options are used
to assure there is always a picture of file at the end of the mosaic
creation. Other
settings
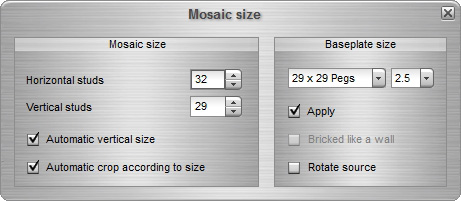
Number of horizontal and vertical studs
(for Ministeck® there is no such thing as a stud, but the same
reasoning apply). This value is a good and practical measure of the size of the
mosaic. For brick the stud size is appr 8 mm, for the Ministeck® appr. 3 mm.
The size is reflected in the status bar.
Automatic vertical size:
when checked the application will automatically calculate the number of
vertical studs that matches with the aspect ratio of the source
picture.
Automatic crop to size: when checked the actual part
that is rendered as a mosaic follows either the aspect ratio of the
source picture (when 'Automatic vertical size' is also checked), or when the user has decided to
indicate the number of horizontal and vertical studs manually. In that case
the aspect ratio of these two values is used. Alternatively, the user can
manually crop a part in the source picture. Depending on the settings of
automatic size and crop the cropped part is adapted when the user selects a
cropped part, or resizes an existing part. When the user starts cropping, a
crop window is shown. To select the original again, simply click somewhere
outside the cropping area. Note: cropping does not work for sideways
placed bricks (like a wall). Also using plates to stack up as a sideways wall
won't work with cropping. You need to pre-crop (e.g. in Photoshop, Paintshop
Pro, Irfanview, etc.) your picture before attempting to create a sideway
wall mosaic.
Apply (base plates): both bricks, Ministeck® and Beads have fixed
sizes for their baseplates. The user can apply these standard sizes to
set the size of the mosaic. In case that base plates are applied
the mosaic size follows the fixed size increments of the selected base
plate.
Bricked like a wall: both bricks and
duplo bricks can be placed sideways. This way the studs are stacked on top of
each other, like building a wall of bricks. The amount of bricks will increase
because the height of the stone is
smaller than the duplo 2-stud wide bricks, but will decrease compared with 1-stud
wide bricks are selected. There is a special tutorial for sideway
bricks.Rotate source: the brick-fitting engine
starts to detect and place bricks from left to right, from top to bottom. In
most cases the pattern will look like a kind of bricked wall, with
clearly horizontal layers. In case the user wants to have vertical layers the
picture must be rotated.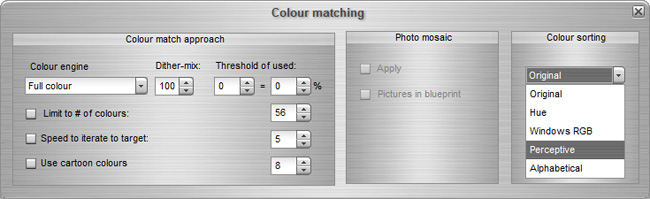
Colour
engine: the choice of engine how the
colours of the bricks must be determined. There is two kinds
of engines: colour engines and black and white engines. The following engines are
available:
Full colour: the source picture is analysed for available colours from the brick palette. When matching
colours are found the corresponding bricks or Ministeck® colour will be selected.
In some cases when a colour is required but no matching palette
colour is available it will select the best possible alternative from the available
palette.
Colour dithered a colour dithering pre-processing step is made. Then the 'Full colour' approach is
followed.
Grayscale: the source picture is first converted
to grayscale. Then the 'Full colour' approach is followed. In this case
also coloured bricks can be selected.
Black
and white (auto): a standard black and white filter is applied (the
black and white dithering with automatic level detection). Then the 'Full
colour' approach is followed, where only two colours are
required.
Black
and white (max): a standard black and white filter is applied (the
black and white dithering with maximum level detection). Then the 'Full
colour' approach is followed, where only two colours are
required.
Black
and white (dithered): a standard black and white dithering filter is
applied (ordered dithering). Then the 'Full colour' approach is followed,
where only two colours are required.
Floyd-Steinberg (B&W): a standard Floyd-Steinberg (black
and white) dithering filter is applied. Then the 'Full colour' approach is
followed, where only two colours are required. For more information about black and white dithering there
is plenty of it on the internet, for instance on Wiki.Dither-mix: the colour dithering can be blended with the
original colours. This way the effect of dithering can be somewhat softened,
while still using the strength of the dithering pre-processing
step.
Threshold of used:
when this value is larger than 0 the
application will try to limit the amount of bricks used to this
value. There is however no guarantee it will reach the exact amount. It will
try to create a brick mosaic with no more than the indicated amounts for all
bricks. This value is active for all bricks of all active sizes and
colours. So: when a 1x1 brick yellow is used 25 times, but the 1x2 brick is
used 5 times, and you want to only used more than e.g. 10 pieces of each
brick, only the 1x2 is discarded from the selection. But, in case also
the 1x1 is used less than 10 times, the entire colour will be discarded,
irrelevant if in a new try this colour can be used more frequently. The approach is iterative, meaning: it will try several times to recalculate the colours
and bricks, until it satisfies the indicated target values. And: once a brick or
stone is discarded, it will not return back to the selection!
Limit
to # of colours: when this checkbox is active the
application will try to limit the amount of colours
to this value. There is however no guarantee it
will reach the exact amount. It will try to create a brick mosaic with no more
colours than indicated with this value. The default maximum value is 56 colours. When more
colours are needed it will show a warning: the excel blueprint file cannot
hold more than 56 (=
54 + black and white)
colours. You should then reconsider the amount of colours you want to have.
This option can be useful
e.g. to keep the colour variety low (cost effective)
or to create artistic effects
(e.g. just with 4 colours).
In some cases the result is not quite so good, and the user is better off to keep
this value equal to 56 and manually edit the end result. In most cases it will
reach a lower amount of colours with the default 56 maximum. Finally, the colour reduction is different
when using the Mosaizer Pro engine. In lesson 6 of the bricks Tutorial more details
are provided.
Speed to
iterate to target: When a
limit of colours is set ('Threshold', 'Limit'), the application will redefine the amount of colours in one action (using colour
dithering). This step is not so very accurate, however still quite a good
start. To make the iteration loop more sensitive for small colour reductions, you should
activate this iteration option as well. It's an alternative way, and can be much slower, to
reach the (almost) exact amount of colours. This approach will iterate down from
the unrestricted amount of colours, by stepwise skipping the colours with the
lowest count until the target amount is reached. It can take quite a while
when a large number of colours and mosaic sizes are to be iterated down (from
seconds to even minutes). The value indicated on it's right (in the above
example: '5') is an extra control to set the Iteration
speed. A low number is
a low speed (small steps down); while a high value will increase the speed,
but will also be less accurate. The difference is small, but nevertheless this control
parameter can be of geat help when you have to get down from e.g. 120
to 16 colours.
Use cartoon colours: this
will perform a similar limitation to the indicated amount of colours, but in a
faster way, and less subtle. It only uses the colours that are found in the
image that are most used, hence the 'cartoon' naming. It will e.g. only look
at 25 colours at most, and therefore this option in only suitable for
cartoon-like images with just a few colours.
Colour
sorting: select one of the four sorting options, or return to the
original sequence. The sorting sequence is not stored, but is just temporary.
In you wish to keep this sequence you need to save the sorted colour database.
This is done in the usual way: via the menu 'Colour table'
'Save table as'. In the status bar the name of the dataset is
changed to '<name> (Sorted)' to indicate that you are
using a temporary colour
database
table. Sorting options:
Hue
colour tone, ranging from 0° to 360°), slightly affected by the saturation to
create
a
logical colour sequence.
Windows
RGB: 256*256*Red + 256*Green + Blue, all colour values between 0-255,
basically starting with black, ending in white; this sorting scale may also
be used to
evaluate
the grayscale value).
Perceptive: the Cr-value in the Y-Cb-Cr broadcast/TV
colour system (Cb-Cr = reds and greens, see
here
for more details).
Alphabetical: the
sequence when a colour name is used for sorting (therefore alphabetical).
Can be useful to find a certain colour by name or code.
Colour
weights: here you can
emphasize a certain colour of the source picture. In most cases this is not
needed, but in other cases e.g. the blue channel is too dominant and too
many blue bricks are selected. To counter this, the user can lower the influence of
the blue channel, by reducing the RGB ratio. The effect is instantaneous,
and can only be discarded by resetting the values to 0 again.
The
filter box is used to
correct the overall colour of the source picture. The effect is immediately
applied in the window of the source picture.
'Apply
photo filter' activates the filter effect.
The white rectangle is the colour of the filter. Click on this
swatch to change the colour.
The Filter transparency is the amount of filter that is
applied to the source picture. Default is 50%, it ranges from 0 to
100%.
The Filter box has a selection of 43 different filters.
Some are too weird to use, but fun to look at. Others can be very helpful to
make the colours crispier, sharper or to correct a certain colour
haze.
Apply transparency is a great way of getting rid of background in images. The transparent parts
will not be used in the brick/bead mosaic, and you will be able to
create image shapes, rather then full rectangular baseplates/pegboards (and considerably
cheaper to create). For instance, when a cartoon image is used, the
background is usually white (or any other solid colour). By clicking on the
colour patch a pop-up window is shown, in which you can click anwhere in the
left image, while the right image reflects the part that will be made transparent. A
few controls for feathring and sensitivity are provided to tune the transparent
part. In the tutorial lesson 5 for beads
more information and
examples is provided.
The Colour requirements box on the right is the
graphical representation of the colours of the source picture, and the
available colours in the brick library. The picture colours will be
live-updated when Colour weights are changed. In the current version it does
not yet respond to changes in the filters.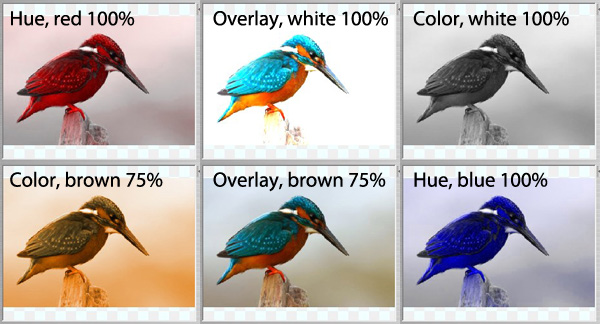
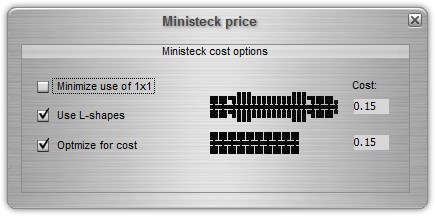
Minimize use of 1x1: in
some cases it's useful to limit the amount of 1x1 because there are just
2 in each commercial colour sets, while the other parts (1x2 etc) are commonly
available. This might not always be very useful because also sets of 1x1
pieces can be purchased where 20 parts per set are
available.
Use L-shapes: some
users don't want these to appear in the mosaic. Also the availability of
L-shapes is not very high, just 4 per commercially available
set.
Optimize for cost:
depending on the previously explained settings, the application can optimize
the use of all the pieces in the commercially available sets and limit the
need for purchasing many sets, where just a few parts are needed. This is not
always a real optimum, it's a computer generated mosaic and in some cases not
optimal to the utmost. This is typically an area we still improve a
lot.
Cost: the actual cost in
your currency of choice (here: 15 euro cents per set). Simply edit this box
and fill in your own value. These values will be stored in your table when
saved.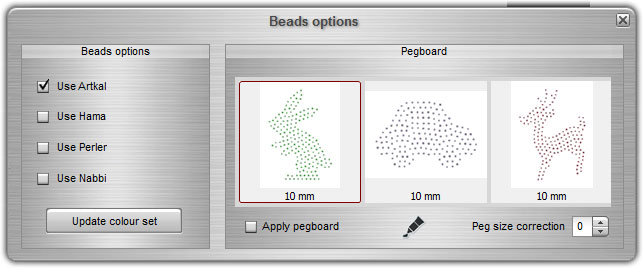
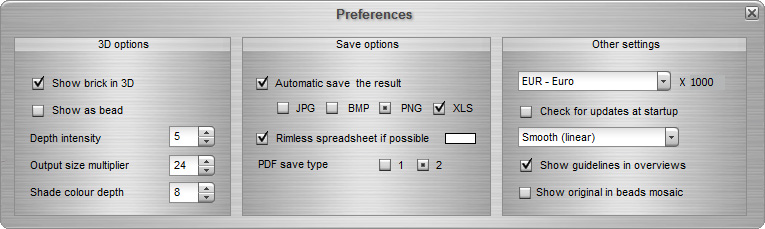
Depth intensity: the thickness and
colour of the computer generated edge of each brick. Below you see the differences in
values. The four on the left
are with bricks, the two on the right are for
Ministeck®.
Shade colour depth:
similar to the width of the shade lines, also the colour of the shade can be
set. This minor control is merely a fun-factor aspect and does not add real
value. Nevertheless, in some cases you might want to create deeper shades for
e.g. printing purposes.
Output size multiplier:
since the entire mosaic is generated by computer code, the size of a brick
must be indicated. This multiplier sets the size of a 1x1 brick in pixels. A
value of 20 is pretty much ok, larger requires more RAM, smaller makes smaller
pictures, but still fine.
Automatic save (of) the result: when
checked also one of the 'PNG', 'JPG' or 'BMP' buttons must be selected. Since
jpg is a compressed format, some users prefer the uncompressed format (png
or bmp). In addition, the 'XLS' option will also generate the excel spreadsheet output.
This is a complete overview of the brick parts, codes, colour, positions,
amounts, etc.
Rimless spreadsheet (if possible):
in many cases you want to have the full build data available. The application
creates an excel file where all the relevant data of bricks, sizes, cost and
amount is shown. You must have an instance of Excel or an Excel Reader
(freeware from Microsoft) available on your computer to read that file. It
will be generated anyhow. In case the width of the mosaic exceeds the number
of available columns in te spreadsheet (256) a new page is added. Until all
pages are printed. There is hardly a limit to the height, so all pages are
printed in full height. To create a page of exactly 256 columns (so: 256 studs
wide) you should activate this option.
In that case the horizontal stud numbers will be placed below the
blueprint, while the vertical stud numbers are skipped, leaving
exactly 256 studs on one sheet. This is particularly useful to create
multiple sizes of 32-stud baseboards.
The
little black (or white) rectangle indicates
which colour the excell cell-edges will have: black or white. By clicking
on this little square it will toggle between these two options. In
most cases black will be fine, while for
very dark mosaics white may be a better choice.PDF save type: there are
two possible output format for pdf save (Menu bar: 'File' > 'Print special').
The type 1 will save the build data for that page on a next page, type 2 will
save the build data on the same page as the blueprint. Type 1 will therefore
avoid that for large amounts of different bricks and colours the build/amount
data gets printed off-page. Type 1 is the default, and this setting is also
remembered next time you open Legoaizer (as with most of all general
settings).