 Legoaizer -
Help Legoaizer -
Help |
Legoaizer -
Help
Tutorial for Beads
Legoaizer has the option to create Beads mosaics. The
application has 4 pre-installed colour databases: Artkal®, Hama®, Perler® and
Nabbi®. Each of these databases contain the colours of the commercially
available beads. The actual availability of theses colours is not included and the user has to always check
if the colours are actually available.
The Beads databases
follow a similar approach as the Standard Colours. To
create a new beads database it is recommended to
first read and try out the suggestions as explained in the
tutorial for Standard Colours. We assume that these databases
are available as a common data set (like with Ministeck® and
bricks). About the cost
indications: the default value of each bead is 0.2 cent. The currency
division factor (see here) is set to 1000, and the value in the databases is 2, so 2/1000 EUR or USD or
whatever currency you are using. The value of 2 is based on an average cost of a
bead: appr. 2.50 euro per 1000 unsorted (January 2016). Lesson 1: My first Beads
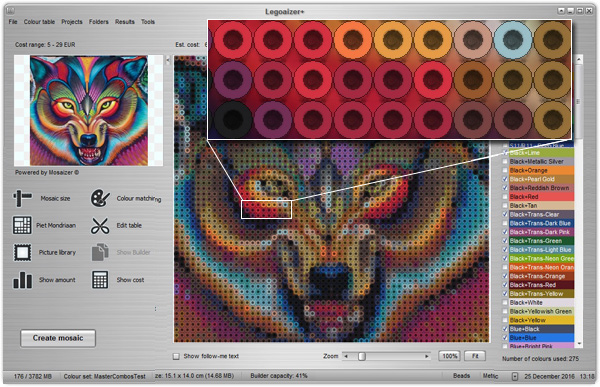
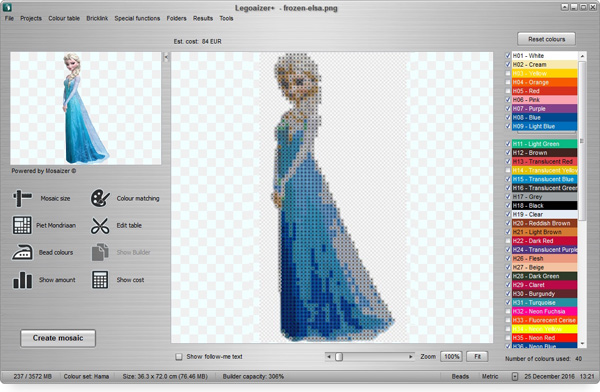
mosaic After
installation the interface is seen full-screen On the right you find the
available colours, on the left the default source picture and some control icons
(actually... these are buttons). This lesson is much like the first lesson of
Ministeck®. By
default the application is geared up to be used with brick libraries, colour and
bricks. To start a Beads project you first need to load a Beads colour library
file (aka 'data file', 'database' or 'data set'; several names are used in
this help documentation for this .xml file). This is done via the menu 'Colour table' 'Open table' and then
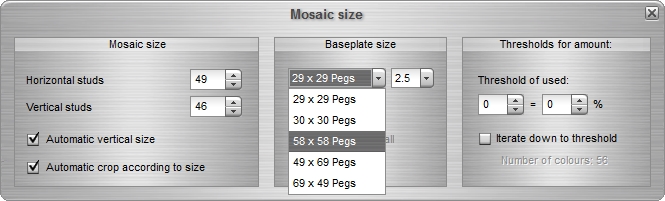
select the 'Beads_Artkal.xml' file. Now open the Mosaic size window by pressing the 'Mosaic size' button. You will notice
that also the base plates (called 'peg board' for beads enthusiasts)
have also been adopted to match with the current boards for bead mosaic
creation. A second selection is now possible: the bead diameter (2.5, 2.6 and
5.0 mm). These values have no influence on the mosaic, only on the final sizes
of your mosaic. The size of the mosaic is shown in the statusbar. The size of
the peg board however is of influence when you want to create building
blueprints, one for each board. This is done via the menu 'File' 'Print special'
. Once you
have opened the Artkal database, you can simply press the 'Create mosaic' button on the
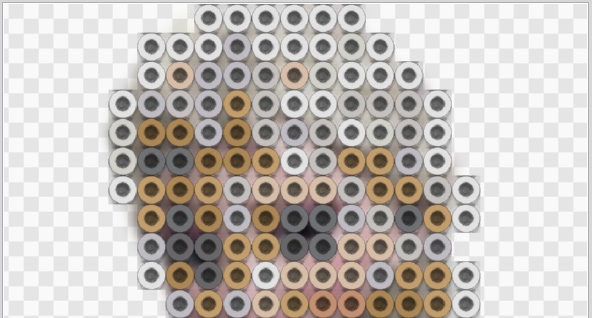
right-bottom. And you are done. This is what you will see (the enlarged part is
added using Photoshop...):
Lesson 2:
Comparing the 4 different colour
sets
Lesson 3: Selecting
the colour set Perhaps the
best is a bit of all worlds. So we should ideally combine colour sets. This is how it is done.
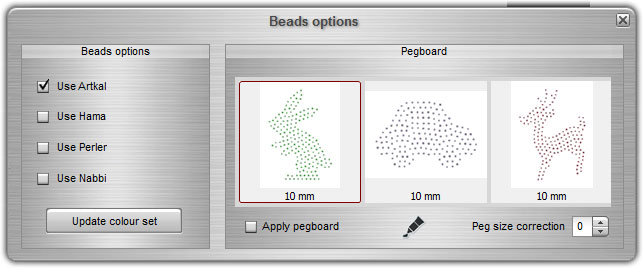
First, press the 'Beads colours' button. This will open a small
window in which the four data sets are
indicated (left part of the pop-up window, as shown below). Select the ones you want
to apply, then press the 'Update colour set' button and
wait until the current set is being replaced with the combination
of the colour sets that you have selected. We will select all the 4 colour
sets.
Once this is done you will now notice that the colours
in the main interface have changed. The colour list is considerably longer than the colour
codes of Artkal only. Then press the 'Create mosaic'
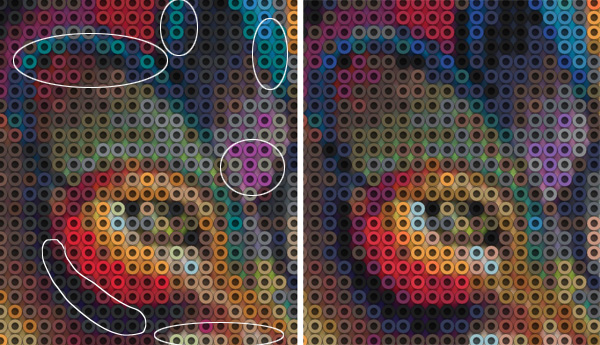
button again. This is what you will see:
Picture above: on the left you see the
result of all 4 colour sets, while on the right you see the Artkal result. The differences are small, yet
noticeable. See the ellipses for finding these differences. One word of advice and information about this
option:
the datasets for the 4 types of beads are pre-selected by the application.
In case these datasets are not showing the correct colour codes (or obsolete
colours, or old colours, etc) you need to change the dataset. The datasets that are being
called when activated are found in the following folder:
C:\Users\Public\Documents\APP\Legoaizer\Standards
and are called 'Hama.dat', 'Perler.dat', 'Artkal.dat' and 'Nabbi.dat'. These
datasets are pre-installed. When you want to change a dataset you should really
first make a backup of the original dataset (e.g. 'Hama.bak'), and then edit the
original to match with your selection of colours and colour names. The dataset
structure is explained in the chapter on Dataset structures
. Lesson 4: Saving
your personal set
You can create your own dataset of
beads. The best way is to start from the set you use the most, e.g. Artkal, like
shown in lesson 1. Now open the Editor (press the 'Edit
table'
button). A window opens (the 'Colour table'). Check or uncheck the colours you want in or out. See picture
below.
As you
can see
in the picture above we have deselected a couple of colours. When you are done, press the 'Update table' button. This will only copy your selected colours
to the current table. Then finally use the menu in this window to save the
table: 'Colour table' 'Save table as...' and
select a new name for the table. Be careful not to overwrite the pre-installed
tables! Now you are done, and next time you start you can now select your pruned
and personal colour set. It's irrelevant if this table is a combination of
any of the 4 colour sets (Artkal, Hama, Perler or Nabbi) because the colour code
is unique for each manufacturer. You simply need to remember which code belongs to which
manufacturer. But there is an easier way to save a beads
colour set. If you have a Standard Colour dataset available, such as provided
with the application, you can simply right-click on the dotted graph, and then
select 'Save as dataset for beads', and choose a set
name. That will be all. This set will appear as a new dataset, and can be read
from the main menu 'Colour table' > 'Open table'. Lesson 5:
Creating transparent sources
In many cases you will start with a 'normal' source image, i.e. an image with no transparency. Especially for beads,
shaped fusion beads are preferred. Also shaped beads typically are
created for children, by children. For instance, a funny cartoon figure as
a source should lead to a cartoon fusion only, excluding the background. We will
demonstrate how we can use transparent sources (already at start) and how
to create a new transparent image using Legoaizer. We will start with the most
common situation: we have an image that is not transparent (typically a .JPG image).
In the next lesson we demonstrate how to work with transparent sources. You find
the transparency controls via the main menu 'Special
functions' > 'Colour
filters', the middle section ('Filters') has the transparency controls at the
bottom. To open the dedicated transparency panel, click on the white box on the
right. This white box represents your selected chroma-key (or: pixel that must
be made transparent).
We have a cute dinosaur image, which we will use for
creating a nice (evenly cute) fusion bead result. The 4 images below show the four steps we are taking to create
a perfectly balanced cut-out of the background colour. Step 1. Click with the colour-picker (now showing when you
move your mouse over the left - original - image) on the colour you would like
to make transparent. We selected of course any white pixel. The result is immediate:
the image on the right is now made transparent where all pixels of that colour
are made transparent. You can see the transparency as the gray background. The
lower slider 'Background' can be used to select your background
colour from white to black (gray is the default). This is a very
convenient way to see the effect of transparency. Step 2. Although at
first sight the transparency seems ok, it's actually not so good. When looking at the (blue)
edges of the dino, it appears to be rough and pixelated. So, we need to expand the
bandwidth of the pixels that have the colour for transparency. Conveniently, the two sliders,
'Tolerance' and 'Feather', can help
to finetune the transparent parts. We increase the tolerance just a bit, and if
this helps we don't need to use the 'Feather'
slider.
In some cases also the feather is required: it smoothes the edges of the transparency,
and also it creates a small band where the transparency starts
from fully transparent to fully opaque: the larger the feather value the wider
this transition band will become. The 'Feather' is the last
resort. We simply increase the 'Tolerance'
until the edges are smoothed out. Step 3. When taking a closer look, you can see that also
the white parts from the eyes have become transparent. The way the transparency
works is that is takes all the pixels of the selected transparent colour
(this approach is also knows as 'chroma-keying'). To exclude the eyes from
taking part in the transparency, you need to select an area where the pixels are
not affected. Now you have to use your mouse again, and click on the image on
the right to create the area that must be excluded from chroma-keying. You need
to click several times, shaping a kind of circle within the head. With every
click a new line will be created, and by double-clicking the last clicked point
is connected with the first point. Now the exclusion area is closed. In the
image of step 3 you can see we have only selected an area in the head of the
cute dino. All other parts are ok. Tip: to select multiple areas: you can add to the
previous areas by pressing the SHIFT key while creating a next area. After double-clicking the areas are now all shown (keep
the SHIFT key pressed until you are done!). Step 4. When you are
done, then again click in the picture on the left, to select the transparency
pixel. Now your selection on the right is inverted, where all the pixels are selected
except the pixels that you just
outlined. As you can see the white parts of the eyes are now correctly kept
white, since these are excluded from the chroma-keying action. Finally, press
the 'Done'
button, tol bring you back
to the previous window. Now tick the 'Apply
transparency' checkbox,
and create your (partly) transparent mosaic. The final mosaic is shown below. As you can see: the eyes
are part of the bead mosaic, while the white background outside the cute dino
was omitted from the resulting mosaic. The inset shows the pegboard, demonstrating
that these outside parts indeed have no beads, and is therefore a direct
result of the transparency steps. Finally, to complete this lesson, we will demonstrate
the effect of the resize approach. The result above was made where the source
images was reduced to the indicated mosaic size, using the 'smart' resize engine. This approach is very useful
for transparency, since it excludes the transparent pixels in the bead colour
analysis. Any ordinary resize method will assume that transparent pixels are
white (!) and the edges of the transparent parts usually have white pixels. The
resize algorithm is selected via the 'Tools'
> 'Preferences' > 'Other
settings'
panel. The
effect is
explained in the image below: The left result is created using the 'sharp' resize method ('nearest neighbour' approach), the
middle is the 'smart' resize method, while the image
on the right is the result of a very widely used 'balanced' (a.k.a. 'bicubic') resize
algorithm. As clearly outlined, the sharp approach creates dotted pixels (it
forces to make a selection of existing pixels), the balanced approach seems a
bit blurred and whitish pixels along the transparent edges. The 'smart' creates a result that is the closest to the
original colours. But it's all a matter of taste, so there is no winner here,
just different methods creating different results. The 'sharp' however should
better be avoided for transparency, but is perfectly suited for preserving
straight lines in the source image (e.g. the Mondriaan images). Lesson 6:
Using transparent sources In contrast
to lesson 5, you can also use source files with already transparent
parts to create a bead
mosaic. The source file must be of the .PNG file format, and
must have a true alpha channel. Some .PNG files have a strange transparency channel and might
not work.
In case you have doubt: simple open the file in the interface of
Legoaizer and do a test run. If the background gets weird colours your file
doesn't have a proper alpha channel (the 'alpha channel' stores transparency data, in
addition to the red, green and blue channel data). In that case you need to
prepare the source image, e.g. with Photoshop, to repair the transparency channel of the image, and save it again as a PNG
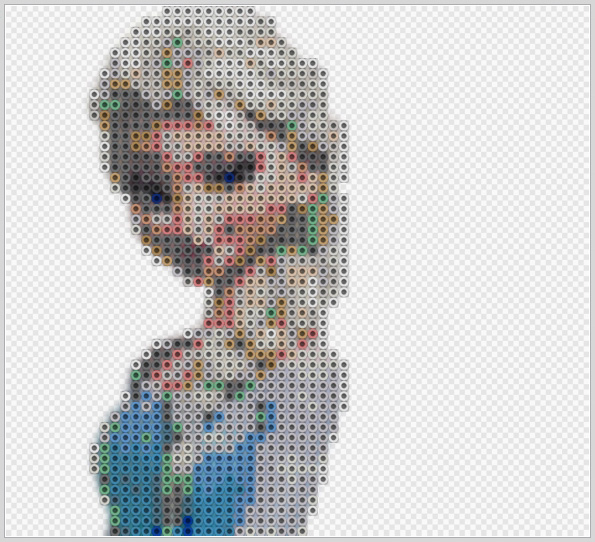
image. We will
use a famous animation figure to show the elegance of transparency. The .PNG has
a proper alpha channel, and when do a first run you will immediately notice that
only the figure is taken into the mosaic, and the rest is left
out. This is a simple run, with just 40 beads on the
horizontal, so we increase the size bit: 80 x 159 beads. This would normally
mean a grand total of 12720 beads, but since large parts are transparent we
only need 5384 beads. The cost is therefore also quite lower: 13.50 euro instead
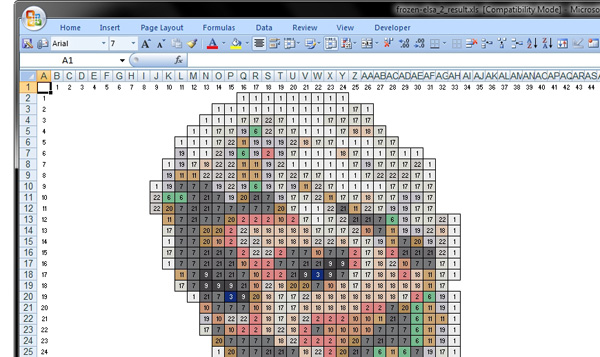
of 31.80 euro (estimations of course). Below a snapshot of the spreadsheet and the detail
bitmap are seen. The spreadsheet blueprint is fully updated with the amount
of beads and the building blueprint. Epilogue: What else is there to
do? Warning 1: if you accidently
overwrite a pre-installed beads colour database, there are two
options: download the installer and be warned not to do it again. Or practice
yourself in using the 'Standard colours'. In the folder of the Standard colours also a copy of the 4
beads databases is found. Use the Standard colours approach to convert that table into a
new beads database. Just make sure you only keep the 1x1 bricks because there
are no other possibilities.
Warning 2: not all the bead colours
sets have the same size. There are 2.5, 2.6 and 5.0 mm beads, and some colours
may not be available for a certain bead size. You need to check yourself which
bead colours are available. The dataset as provided is just a set of colours,
not the set for a special bead size.
There are 4 pre-installed colour sets, from 4 different
manufacturers. We will now compare each colour set. To do so we first create a
much larger beads mosaic. First set the baseplate size to 58 and then make sure
the mosaic size has 116 pegs on the horizontal. The amount on the vertical is
then 109, to match with the size ratio of the original. When we first
create a full size mosaic with Artkal, then switch database (via the menu 'Colour table' 'Open table'
etc.)
and load the Hama, Perler and Nabbi respectively. This is what you now should
see (picture below). You have to look very closely
and see subtle differences. Although
the result seems comparable at first, some striking differences can be seen. For
example the greens from Perler are less pronounced, while the Hama orange is
quite saturated, and the reds from Nabbi are also quite saturated, and
Artkal has quite a range of blue colours. For each colour set we
have also added
the dotted graph. Clearly differences can be seen in the
colour selections of each bead manufacturer.

![]()
![]()
![]()
![]()
Basically you can do anything else that can also be
done with a brick. The beads approach fully follows the brick approach,
except the beads are considered a 1x1 brick. So read the brick tutorial... and
enjoy the other possibilities!