 Calligram Creator -
Help Calligram Creator -
Help |
Calligram Creator -
Help
Administrator functions
The Administrator functions
are the following: Manage
all the application's external inputs, like text, colour and mail client
settings. On top you find
the 4 input files for Calligram creation:
Below you find 3 folders: Finally,
three more files are important to mention: the 'Output picture file' is the name of the currently
created Calligram. This text is greyed out, since the name is automatically
created using a timestamp string format ('YYYYMMDD_HHMMSS'). The last file
placeholder in this picture is the mail client file. The default is 'MailClient.ini', but you can also use
your own client data file, and change this file entry in this tab to your own
file. This is quite convenient in case you wish to use different mail clients
for sending the Calligram. And finally the Booth background
image: this is the backdrop of the booth, when active. The image
should be the same size (or at least the same aspect ratio) as the monitor for
the Booth mode. The image will be stretched to fill the entire booth
interface. Example images are found in the 'Data' folder, but
ideally the techie should assure that a proper image is used. The image should
also take care of the location of the buttons. To make a fit-for-use
backdrop, you should first start the booth mode (full screen) on the
intended monitor, and then make screenshots of the buttons in action. Only then you know how the backdrop will stand
out against the buttons. The two buttons at the bottom are used to either
restore all the values to default (= as installed), and to save the values
in the configuration file. In the latter case, next time you start the
application the new values will be used. One word on the content of the 'Colour profile file'. This file contains
colour codes
in the hexadecimal format. For instance:
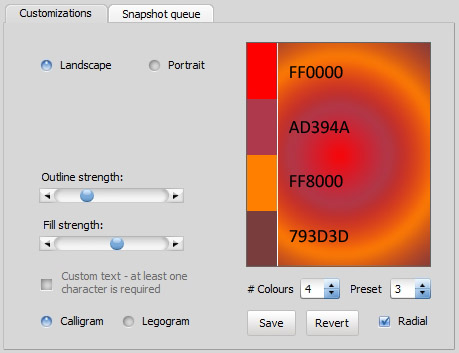
The corresponding colour are shown in the picture below: On the left you see four colour patches. These are the 4
colour codes in the colour code text file. When the application creates the
colour profile from e.g. these 4 colours it will interpolate between each of the
4 colours, via the HSL colour system. When you change the number of colours it
will now create a 5th (random) colour at the bottom of these 4 patches. When
decreasing it will again delete the last colour patch (from the bottom). The
colour profile is immediately updated. To return to the text file patches, press
the 'Cancel' button. To save the current colour
codes, press the 'Save colour'
button. It will replace the currently indicated colour code text file.
The 'Preset' indicate has 18 different presets; while
the checkbox 'Radial'
will create a circular colour profile. You can also change each individual colour patch, by
clicking on it (the hand cursor indicates a clickable area). Make sure you first
select the number of colours: when you now change the number of colours the
colour patches can also change colour
because it selects a random colour when more colours are chosen, but also discards previous
colours when fewer colours are chosen. 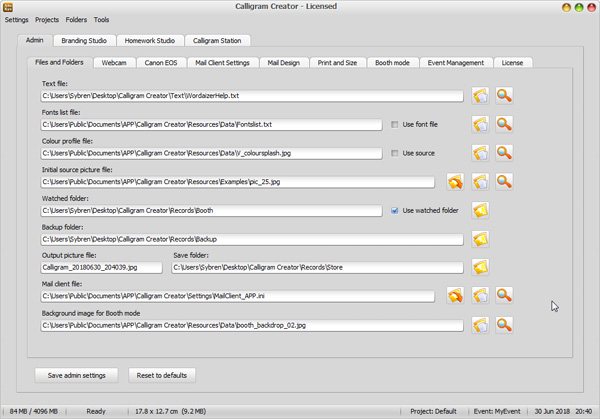
'Text
file' = the actual text that is used to print the Calligram picture.
The text file can be either a free format text, or a predefined
file with words and a value, indicating the size of each word. The
predefined format is very specific and should be followed very accurately to
avoid reading errors. The free format text should ideally exist of hundred, or
even thousands of words. When this type of text file is use, the application
will count the frequencies of each unique word, taking capitals
into account (so 'the' and 'The' are two different words). The words with
the highest frequencies will be printed first, in the indicated (maximum)
font size. Every next, word with lower frequency, will be printed with a
smaller font size. To avoid that the wrong words are printed, you should use
the predefined format, in which you can accurately define which words should
have which fontsize. Please assure that the amount of words is sufficient to
fill the Calligram (black) areas. Both kinds of input file must be a .txt file
format (Unicode or ANSI is both accepted), but basically created with
Notepad.
'Fonts list
file' (optional) = the text file containing a list of applicable fonts.
The fonts in the list must have the exact name of the font as used in your
system. When the option to use a font file is checked, the application
randomly selects a font from this list for each next word. If not, the
application will use the indicated font (managed in the 'Snapshot Studio').
'Colour
profile' = the picture file or a text file
with colour codes that is used as the colour template for the Calligram. In case of
a picture, this is first resized to match with the Calligram size. In case
the colour profile is not used, the source picture provides the
colours. In case of a colour code file (.txt file extension, see also
here), the application
will distribute the colours from top to bottom, where the change from one colour to the next is done
via interpolating between the two hue factors. The more colours in the
file, the smaller the interpolated bands of two colours will become. The third button
(with the 'rainbow' colours) is active when 1. the text
file is a colour text file and 2. when the colour tweaking interface is not yet assigned to the Calligram
Station.
'Source
photograph'. In case a tethered camera or the webcam is used, this
file is replaced by the new snapshot picture. In fact, the picture indicated
in the above overview is only used for testing, to properly start and
test its basic functions. The application cannot manage/control a
tethered camera, since this would require (expensive)
proprietary camera API integration with the Calligram Creator code.
'Hot folder' = the folder that the
application actively listens to, and whenever a file is found (e.g. webcam,
tethered DSLR) the photograph is automatically loaded in the application, and
a black and white Calligram base is created. When the checkbox 'Use Hot folder' is unchecked the
application will not automatically create a
Calligram black and white ('base') picture. In that case, only when you have
pressed the 'Load' button, and
the indicated picture exists, the Calligram base is created. The default is
therefore 'Use Hot folder'.
'Backup folder' = the folder in
which the snapshot picture is copied to from the Hot folder. In this folder
all the original photographs are stored. You should never delete any file in
this folder, since it's also required for reprints, and 're-Calligram creation'
(e.g. step 5).
'Save folder' = the folder in which
all the ready made Calligrams are stored. Similar to the 'Backup folder',
this is an application critical folder, and content of this folder should
never be deleted. 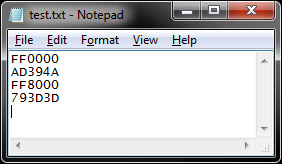
Use an externally attached or internal webcam to make the snapshots.
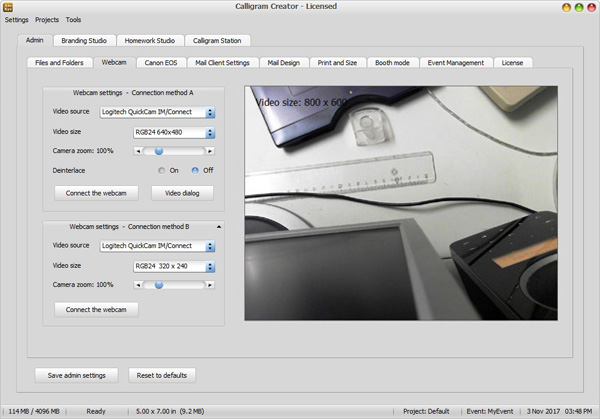
There are two ways to connect the camera to the application ('Method A' and 'Method B'). The reason for having two is that in some rare cases the webcam is not recognized or accepted by the application. One of the reasons is the colour system the camera is using. The top box is more flexible that the bottom box, but it's unpredictable which one will work for you. The functions in the boxes are however identical. The webcam functions are quite basic:
All the relevant mail client settings are managed here.
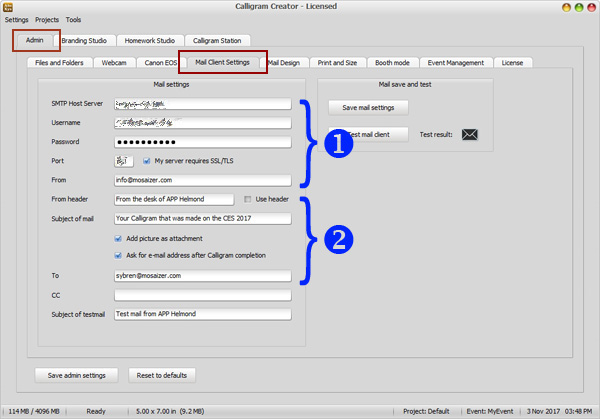
The data marked as '1.' are the mail client data of your mail account. These data are too specific to explain in these steps. You should find the settings yourself, based on the details from your e-mail provider.
The data marked as '2.' are more specific data:
The content of the actual mail is managed from this tab. It includes a WYSIWYG editor.
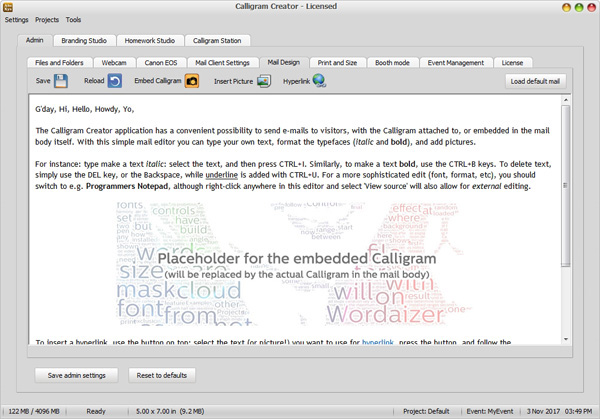
Here you can create the mail body of your mail. The default mail body is shown here, and also shows a placeholder for the Calligram. When you want to embed the Calligram in the mail body (like the example above) you must have the placeholder in place. In case you want the Calligram added as an attachment you must delete the placeholder (otherwise it will be sent anyhow....as this picture embedded). The following basic functionality is offered (in html e-mail format):
The editor understands common editing functionality, such as delete, erase, CTRL_B (=bold), etcetera. To perform more accurate editing you should consider using a proper html editor. Since the application understands html mail formats, you can also use css formatting, in the MailSource.htm file. Please first test thoroughly before using it in an event.
The mail test that is actually sent is the text that is currently visible in the mail editor. In case you have loaded the previously saved mail text, and applied a few edits (and didn't save these edits yet), the edited mail text will be used. This way small personalisation or situational mail text can be created. When the application is closed without saving the edits, the changes will be lost. This is therefore a WYSIWYS ('what-you-see-is-what-you-send') editor.
In this tab you manage the printer and paper size settings, and also the reprinting of earlier created Calligrams.
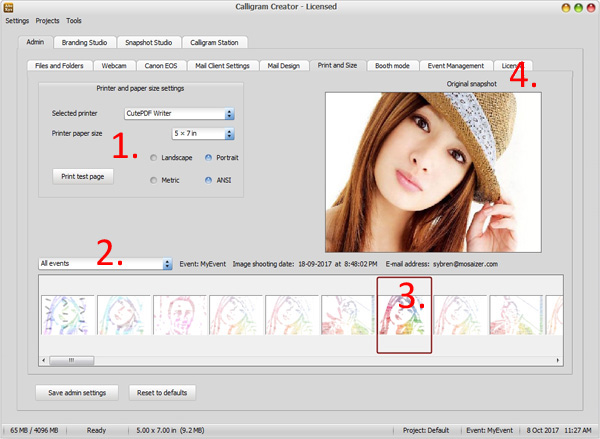
You will find 4 functions in this tab:
6. Event Management
This tab has three functional groups:
Event management: To inspect the progress of the Calligram creation, including error and warning messages, and to select an event for the data logger.
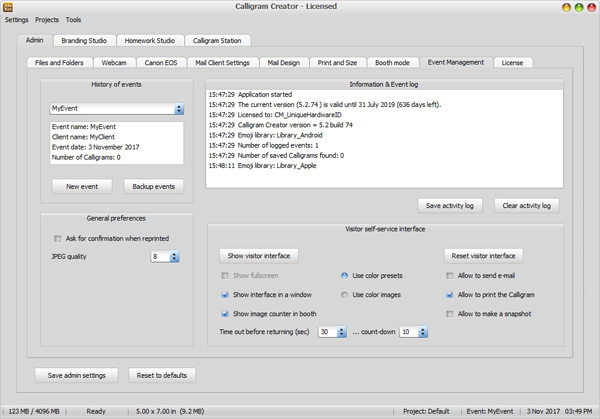
On the left you see the event creator, and event selector. The event selector will select the event for which all the new Calligrams will be tagged. You can select different events during one session; it will automatically tag to the correct (currently selected) event. After selection you will find a short summary in the box below the selector, summarizing the tagged data.
The button 'Create a new event' will allow you to create a new event. This will be added to the selection boxes, here, and in the 'Print & reprint' station. A new event is automatically selected as the current event.
On the right you find the event logger. It simply records all the steps it makes, and if something is wrong it will tell here what happened. The log can be saved, or deleted (and start new logs again).
General preferences: in the current version only one preference is active: 'Ask for confirmation when reprinted'. When checked the operator is asked if the reprinted file should be deleted (it is stored anyway). The file that is moved is the one that is still visible in the 'Snapshot queue' in the 'Calligram Station'.
Booth interface: Several controls are available for initiating the interface, and for setting the allowed visitor actions. Details of how to work with the Booth GUI is provided here.
7. License
The tab for inspecting the license file (and how many license days you still have).
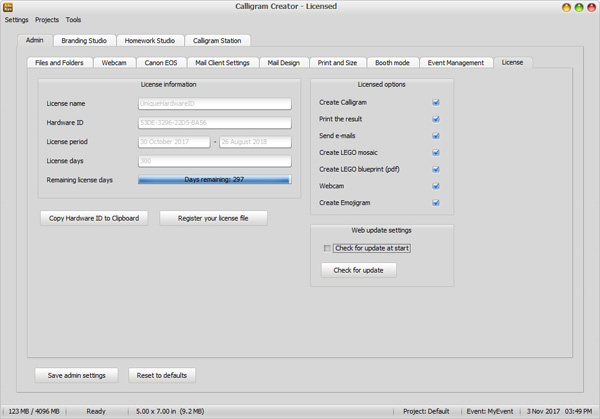
When you have purchased a valid license file, the client data is reflected here. The license file is connected to the hardware via the so-called 'Hardware ID', as shown in this tab. This hardware ID is a unique identifier for your system on which this application is allowed to run unrestricted. At the purchase you must provide this hardware ID to receive the correct license file.
The License options may be checked or unchecked, depending on your purchased license. In general, the Demonstrator license will unlock all the features, but it will add a nag text ('DEMO') to each output. Please consult your vendor for the different license options.
The button 'Copy Hardware ID to Clipboard' is a quite useful and error free method to copy the Hardware ID in e.g. a mail to your vendor. This ID is required to create the license for running Calligram Creator on your system. A shortcut to paste is to use the CTRL+V keys, this will be the same action as 'Paste' via a menu bar (e.g. in your mail application);
Finally, in this tab you can also set the automatic update ('Check for update at start'): whenever the application is started it will check for an update. When it finds one you are notified. In case you only wish to manually check, press the 'Check for update' button.