Pattaizer -
Help Pattaizer -
Help |
Pattaizer -
Help
Harmonics
There are two types of
so-called 'harmonic' patterns: generated using the Harmonograph, the other by using a Pantograph. Both are part
of the family of the so-called 'Lissajous figures'. But generated in a completely different
way. Both patterns are created using the mathematical formulas of the movement
of a mechanical contraption. A Harmonograph is a mechanical
instrument consisting of at least two clock-like pendulums to which a pen is
attached. A paper is used to draw the harmonic curve when the two pendulums are
swinging. Some harmonographs also have a rotating or swinging paper to add more
complexity (or creativity) to the output. A Pantograph does not exist in this
field of harmonics drawing. It's the name of what we have given to this
instrument. It resembles the harmonograph a bit and instead of two swinging
pendulums, two rotating disks are attached to a pencil via two rods, connected
like a well known train pantograph, which in turn is drawing its path on a piece
of paper. In some cases also an smaller ('inner') disc rotates on a larger
('outer') disk, to allow for a little bit more rotation variations. On the
internet alternative names are found, such as Pintograph or
Rotating Harmonograph. The two pictures below may explain
better that what we described in words above. Left: a
harmonograph; Right: a pintograph. (Disclaimer: pictures are only used
for explanation, no infringement of the owner's rights is
intended). The
Harmonograph Figure above: a
photoshopped version of the original (www.karlsims.com) to effectively show a
couple of harmonograph variables in the Pattaizer application. There
are 4 identical variables for
each pendulum movement. Some are also explained in the picture below. These
are (see picture): Next to
these 4 basic variables also interaction
variables are used to define the dependencies between the two pendulums and the
(rotating) paper. In the picture below these are shown. The 'L' is the left pendulum, the 'R'
stand for the right pendulum, the 'Hor' and 'Ver' apply to the paper ('write
disk'). The following interaction
parameters can be set: Note: if you check both sync
options you will not get a straight line because the harmonograph does not
change directions of pen and paper disk (relative to each other).
Make a High Resolution
picture
The last common parameter is
actually the 'Update mosaic' button. When the
Pantograph or Harmonograph pattern is selected the button changes it caption to
'HiRes picture'. Both harmonic patterns are
automatically updated (the 'Auto-update pattern' does
not work here), and to create a High Resolution picture you need to press this
button. Please be aware that text
images, as in-app generated, will not be recognized by the two harmonic
patterns. To make a text pattern, and then apply a harmonic pattern you
first need to create the text image yourself, save as a bitmap, open it in
Pattaizer and then use it for the colours of the harmonics. The
Pantograph Left: a reasonable good pattern with balanced parameters.
Middle: it looks like chaos with no repeating but with a slightly
shifting pattern. Right: same as the middle, but now as a High Res
rendering on a black paper in full colour. Now it looks like very
nice fireworks.
To show
how the pantograph works we have compiled a schematic drawing, see below for explanation and
definitions.
A number
of parameters can be set for the pantograph figure. There are three groups of
settings, and two groups of common controls that are the same for the
harmonograph (see paragraph above). The settings for the pantograph
are: The
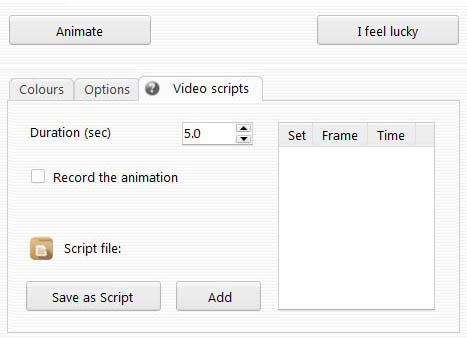
Video feature of the harmonics The
controls are identical to those of the mesh/grid-based patterns, see here for detailed descriptions of each of
the script creation and script loading options. There is however a special extra
video option available for the two harmonic patterns: 'Animation'. The Animation button will
start to record the progress of the actual drawing action of the harmonic
pattern. As if you are watching the contraption move and sway while drawing the pattern on a
sheet of paper. To record the animation and save as a video file,
you also need to check the box 'Record the
animation'. If not, the animation will be shown in the GUI, and no frames are
saved in a video
file.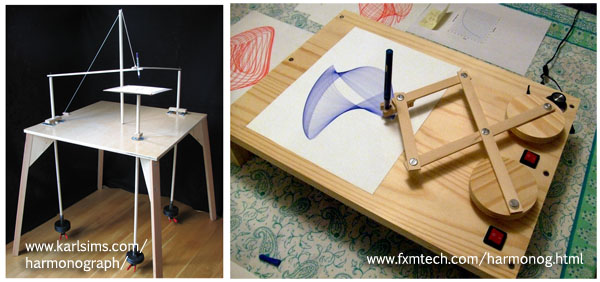
There are a number of controls for the
harmonograph. The two
pendulums are called 'Left' and 'Right ', but they could be called any name (like 1
and 2 or A and B). The paper movement naming can be somewhat confusing, since
it's called 'Horizontal' and 'Vertical'. It is basically a rotation where
the paper pendulum can swing
in a horizontal and vertical direction, showing in real life as a
rotating ('ellipsoidal') movement.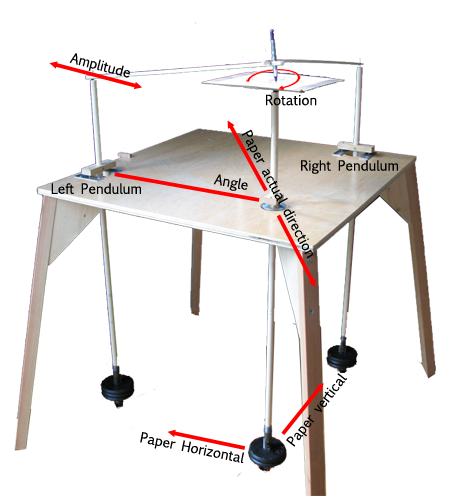

Frequency: the amount of
swings per second. In most cases these values are very
small.
Amplitude: the initial amount of distance when starting the pendulum
(see picture).
Damping: a degree
of slowing down the pendulum with each complete swing. It's also a
measure of the amount of friction of the mechanical hinges that eventually
slows down the pendulum until it stops completely. The damping should not
be too small to avoid that the pen hardly changes course after a full
swing.
Phase: this is a measure
of the timing difference between two pendulums. It seems a bit odd to have a
phase for each pendulum while it only matters when multiple pendulums exist.
However for the mathematical simulation it certainly adds a flavour to
the resulting drawing.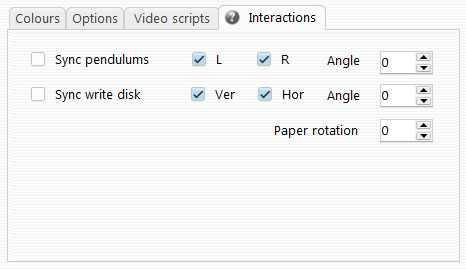
Angle: the angle between the
direction of the pendulum and the direction of the paper (see picture). The
top value of the Angle is the angle between the two pendulums, the bottom
value of the angle between the two virtual movements of the write disk.
If the latter angle is 90 degrees it will follow a circular
movement.
Rotation: the paper can also rotate
(next to an ellipsoid movement due to the 'horizontal' and 'vertical' swings). See picture
below. In real life this is mechanically challenging, but in mathematical
world we can add all kinds of interesting new variables in the
harmonograph.
Sync
pendulums: to avoid settings identical values for the two pendulums you
can also check this box. It will also hide one pendulum tab (the right
pendulum).
Sync
write disk: similar as the synchronization of the two pendulums the
movement of the paper disk can be synced. In this case the paper disk will
make a perfect circle when synced.
The other boxes for
'L', 'R', 'Ver' and 'Hor' can be
unchecked if you want that part of the mechanism not to
swing.
There are a number of common controls for both the harmonograph
and the pantograph.
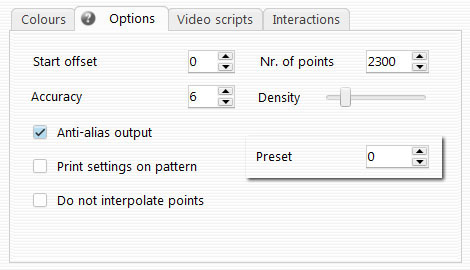
Number of points: the
number of lines to draw the Lissajous figure. Usually 1000 lines are
enough for an initial evaluation. In some cases you need (or want) to
increase the number to make the result look more
'filled'.
Start offset: in some
cases the first line is clearly visible, e.g. standing out on the outside of
the drawing. In that case you can try to obscure this starting line by
skipping a few lines at start. In most cases the starting point will visually
disappear.
Density: the amount of lines in the
Lissajous result while keeping the shape and size. A large value of density
may lead to less sharp curves. This options is only available for the
Harmonograph. The option that is available for the Pantograph and not for the
Harmonograph is the 'Preset'
value. Here you can choose from a couple of great
presets, showing the possibilities of the Pantograph pattern.
Note:
the pen thickness control is the same as for the other patterns, where the
'Line'
value positioned at the top
of the interface, also sets the pen width/thickness of the harmonic
patterns.
Autosave current settings:
when you have found a nice set of parameters you would like to either
save it as a project or keep these settings, so it starts with that great
initial picture when the application starts.
Print settings on canvas: in
some cases you want to record the actual settings when you create a High Res
bitmap. It can be very hard to recreate that great result again if you forgot
to record the used settings. The parameters are printed in the left corner at
the bottom of the bitmap.
Anti-alias output: the
drawn lines are sharp lines. To avoid this 'edgy' look of the lines you can
activate this option. For very large bitmap outputs this may cause
instabilities because it requires approximately 25% more RAM to create the
anti-alias.
Accuracy: the accuracy of
anti-aliasing. This value is also directly related to
the size of the output bitmap! On some systems the amount of required RAM may
not be enough. The value of accuracy will set the amount of RAM needed to
anti-alias the resulting bitmap; low values are usually fine but less
anti-aliasing, high values might lead to RAM problems on some low-end systems
and laptops.
Do not interpolate points: the High
Res output will use approximately 8 times more points between the draft
Lissajous picture. For the Harmonograph this is not a real issue, but for
the Pantograph this option might be activated to maintain the draft result because
of the instability of some settings when enlarged to High
Res.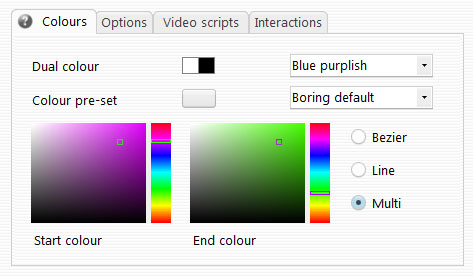
Dual colour: these two rectangles can be clicked on,
defining the colour of the line (left square) and the colour of the
background/paper (right square). The 'Boring default' is dark gray pen on a
white paper background.
Colour
preset : in case you want to vary your output a couple of
examples are available in the application. These colour combinations are selected
in the drop-down box (here the 'Boring default' is shown).
When you want to add your great new colour combination, press the little
button left of this selection box. It will ask for a name and it will add this
to the drop-down box next time you start the application.
Bezier, Line and Multi: there are three ways to draw a line in the
Lissajous figure. 'Line' is just connecting
the two points which are calculated in the mathematics of the harmono- and
pantograph. 'Bezier' is the mathematical term for a line that takes the
location of the next point into account adapts its curvature and direction accordingly.
This way a Bezier line seems to seamlessly follow a smooth path between the
calculated points. It's also the default at start. 'Multi' allows for a change of colours. The colours
can be set in several ways:
Use a preset from the
drop-down list (default is 'Random
colours').
Select a 'Start colour' and 'End
colour' for each preset. The colours can be set using the two colour
controls. Each control has a square area for selecting the lightness of the
colour and the saturation; and a hue selector on the right. Use the mouse to
move the little gray square and line in these controls.(No illustration): at the
bottom of the interface you'll find two more controls that work for both
patterns: 'Paper rotation' and 'Fill-out'. The first will rotate the pattern in view the
second will maximize the pattern to fill in the available space. In that case
the zoom and pan features won't be active.
The pantograph is more difficult to manage than the
harmonograph. One of the reasons is that the pantograph does not easily follow a
smooth Lissajous pattern where a repeatedly drawn figure shifts gradually, e.g. by
paper rotation or damping. It is based on two stable rotating disks that are both
connected to a rod, which come together in a single hinging point, where also the
drawing pen is attached. Since the movement damping of the drawing pen is less controlled. The drawing really gets its good looks
from a balanced set of parameters that apparently create a slightly varying path once a
full cycle of the pen movement has been completed. In many
cases the result is absolutely
different. But not necessarily bad. Check out these two example in
the next picture.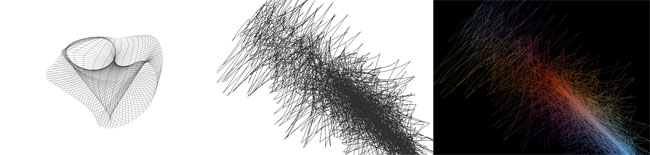
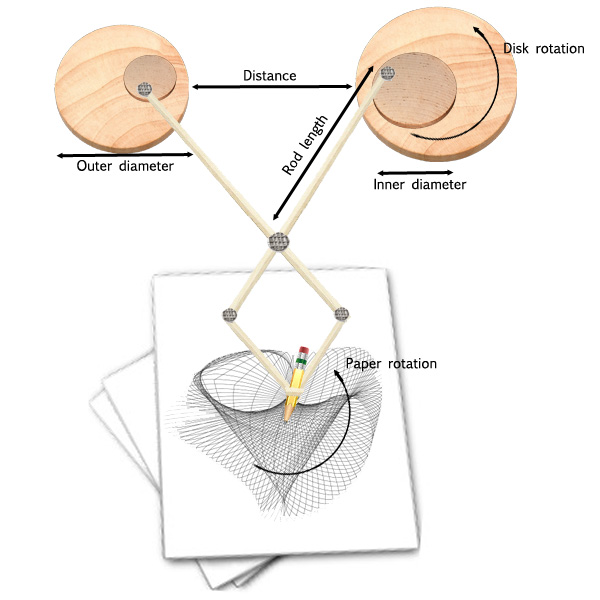
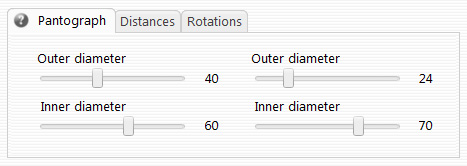
Outer
diameter: the diameter of the large disk on which a smaller disk is
placed, on which the rod is connected (see schematic drawing
above).
Inner
diameter: the diameter of the inner disk. This is basically the same as
the radius of the connection point of the rod. The inner disk actually does
not move relative to the outer disk.
Distance: the distance between the two large disks (see
schematic below).
Rod
length: the length of the two identical rods that connect the inner
disk with the pantograph part, and finally attached to the drawing
pencil. (see schematic).
Zoom factor: to enlarge or make the
pattern smaller (a part of the pattern can move outside the view). Is not applied in case the pattern
is filled-out.
Pan left/right: this pattern
typically tends towards the right, so a bit panning migth bring the pattern
back in teh center of the view. is not applied in case the pattern
if filled-out.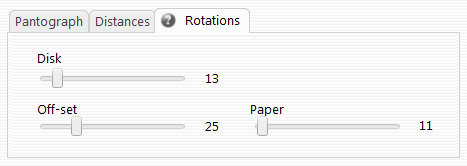
Disk
(rotation): the rotational speed of the outer disk
Off-set: the rotational speed difference between the two outer
disks. This is a simple way to set the rotation speed for the two disk, then
apply a kind of 'brake' to one of the disks, to effectively create a
deviation from a repeatable drawing path. It creates extremely beautiful
drawings when set to small values. At high values there may not be a
sufficiently repeated shape as the basis for the Lissajous from the
pantograph.
Paper: the rotational speed of the paper. As with the
'Off-set' this value can create highly
unstable Lissajous patterns. But is also a basis to create extremely unique
patterns.
Preset: this is a quick way to start
with a stable set of values. These pre-sets are defined
by the application and cannot be changed (well... you can but be
careful with editing the 'ColorPresets.dat' file, always make a backup
first).
The two harmonic patterns also have a dedicated video
settings tab: