 Event
Mosaic Creator -
Help Event
Mosaic Creator -
Help |
Files and folders
The Event Mosaic Creator application has a
very strict approach to files and folders. This is needed
to
be able to manage the user generated data and files (the #tag images, prints,
saved files) and to manage the settings. Parts of this chapter are also
found in the tutorial (quick start).

The Watched (root)
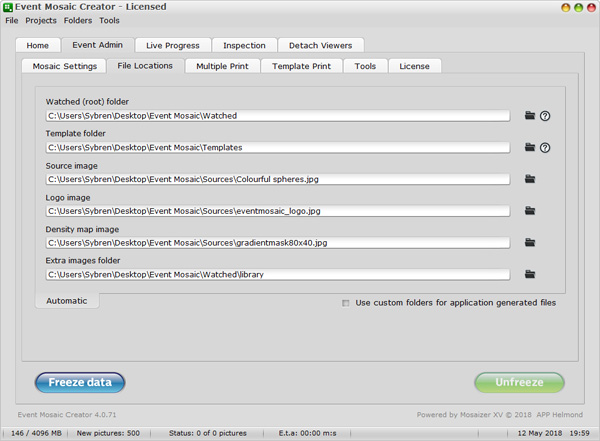
folder in the above screenshot is a very important folder. In this
folder ALL the data is stored of the application. Not only it specifies where
the #tag images, text, uploader profile etc. is found, but also where to save
the outputs from the application. For that reason the Watched folder must have a specific structure to allow the
application to read and write correctly. Two other folders are as important: the
sources for the mosaic, and the templates. Without these specific locations (and
content), the application cannot create an event mosaic.
In the Sources folder and
Template folder you must have at least one file have
made available. With the installation we have already added a few examples, but
you should carefully put your own source and template files in here as well (or
change the location, but be careful to add at least one file).
From top
to bottom:
-
Watched (root) folder: the root
folder where all the data from the application is saved. This folder has 5
mandatory sub-folders, explained below. It depends on the image/data
grabbing application what kind of data is saved. We recommend to use 4K
Stogram. It's freeware (with a very small cost to allow for
unlimited downloads). Next to only images, Event Mosaic Creator can also
use the #tag text, sender name and sender image. The current amount
of #tag pictures in the watched folder is now indicated (here: 'New
pictures: 500').
-
Template folder: the folder where
the print layout templates are stored. These templates must be ready made,
preferably in the correct print quality, e.g. 1500 x 2100 pixels for a 300 dpi
print of 5 x 7 inch print, including the commercial messages. Templates are
typically used when you want a print with sponsor messages, or event
information. Templates also have the possibility to add the uploader's name and
image (only when #tag grabbers are used).
-
Source image:
the image from which
the mosaic is created. This image will be recreated with the
(uploaded) #tag images.
-
Logo image: the image of a logo,
which can be shown at regular intervals. Only one image can be selected. This
image will become part of the mosaic, and should also be printed, like any other image.
Density image: the image that is a
representation of the positioning sequence. The positioning sequence can be
optimized (determined by the best colour fit), fully randomized, or following a
pattern. The pattern is 'coded' by the density map. This 'coded' map is a
grayscale image (no colours!), where the darkest pixels will be placed first,
gradually following the predetermined placement sequence until the lightest
parts are reached (the last placements). Ideally, the density image has the
same size as the amount of images in the mosaic, or multiplications thereof.
Density maps are therefore small images (e.g. 100x50 pixels for a 100x50 tiles
mosaic). We have added a few examples in the installation.
-
Extra images folder: the folder in
which additional (prepared) images are stored. These images can be added to
the mosaic, e.g. when not enough images are send via the #tag address, or some
typical colours are likely not available, and these images can fill that 'void'
of colours effectively. By some it's considered as 'cheating', but it will save the mosaic if
the progress from new pictures gets too slow, and time rushes out.
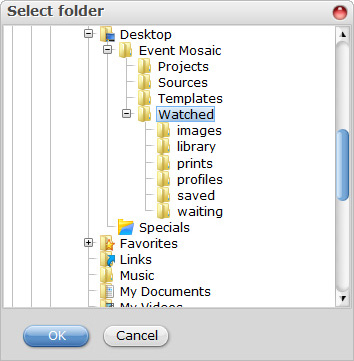
The 'watched' folder has a specific
(recommended) structure:

-
images = the folder
where all the #tag images are saved (required folder).
-
library =
the folder where back-up images are stored that
can be used to fill the mosaic from prepared images.
-
prints =
the print-ready files that are queued for
printing during an event (required folder). Images in this folder still needs
to be printed.
-
profiles = the folder where the text files are stored of
the #tag sender (optional folder, required for e.g. BYO Booth).
-
saved =
the folder where all the processed images are
stored (required folder), as the end-stage of the process. Images in this
folder are fully processed and printed.
-
waiting =
the folder where all images are stored, from
the #tag grabber, before sending them to the images folder for
processing.
Manually selecting the watched
folder locations
In addition you can select different sub-folders of the
watched folder. There are 4 sub-folders that can be manually set. When the 'Use custom folders for application generated files' is
checked, a second tab will be shown. In this new tab you can now indicate your
own sub-folders. If you change any of these folder locations, it's not possible
to resume from an existing event, since these data are critical operation data
and you can only change these folder locations at the start of an event. After
changing these parameters, the user is strongly recommended to save the settings
as a project file, and run a test event, e.g. with stock images. When all works
as expected, the user should first re-save the settings again in a project file
and, then allow these settings to be used in an event.
In general it's not recommended to
change these folder locations. The back-up feature depend on this structure, and
may not fully complete the backup action. Also when projects are saved with a
different structure, the project may not be opened correctly. The best way to
create locations for multiple events is to rename the folder on the desktop to
the event name, and keep on saving (or backing-up) these
folders.
Copyright © 2017-18 APP Helmond
 Event
Mosaic Creator -
Help
 Event
Mosaic Creator -
Help
