 Calligram Creator -
Help Calligram Creator -
Help |
Calligram Creator -
Help
Quick start
To start a
Calligram creation please follow these steps: Step 1: the initiation of
your event Start the application (assuming
you have done a clean install, with no history of previous versions). The first
time you start the application you need to provide event data: These event
data are used to tag each Calligram that is created in your event. The provided
suggestions are shown above. If no text is found in the indicated boxes, the
default 'Event name' is 'Demonstrator' and the
default 'Client name'
is 'APP Helmond', while the event
date is the date of creation ('today'). Then press the 'Create new event' and you are good to go for the next
step. Step 2.
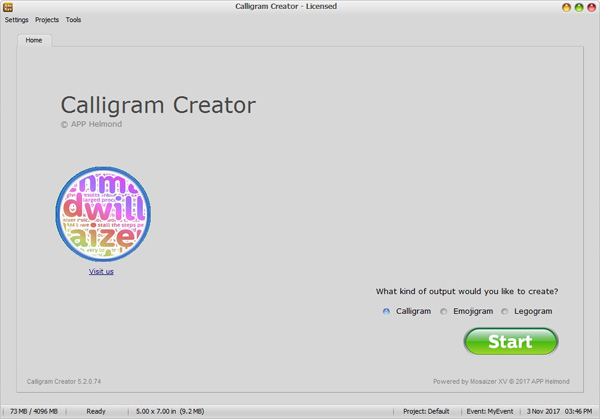
select the kind of output The application will start in
a home screen, where you can also select the kind of output for your session.
This type can always be changed afterwards in the 'Calligram
Station'. We select 'Calligram' and press the
'Start' button. Step 3.
the first Calligram
The installation comes with some example pictures. The initial settings are such
that you can start immediately to create a Calligram from a pre-installed
photograph. Before pressing the 'Create Calligram' icon on top, we first show you the source of the example
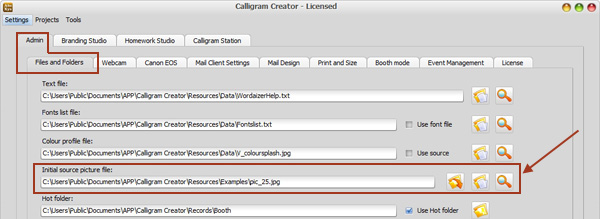
picture. To find this information, click on the 'Admin' tab, and then the 'Files and
folders'
tab: Top-left
you see the two nested tabs: 'Admin' and the 'Files and folders'
tab under Admin. In the red rectangle at the bottom of
the above picture you find the file location of the example picture that is shown after
you have started the application (here: 'pic_25.jpg'). On the right you see
three buttons. Press the far-right button, and the default Photo-Viewer in your Windows system
is opened, showing that picture. You can see it's the same picture that you also
see in the 'Calligram Station'. Then
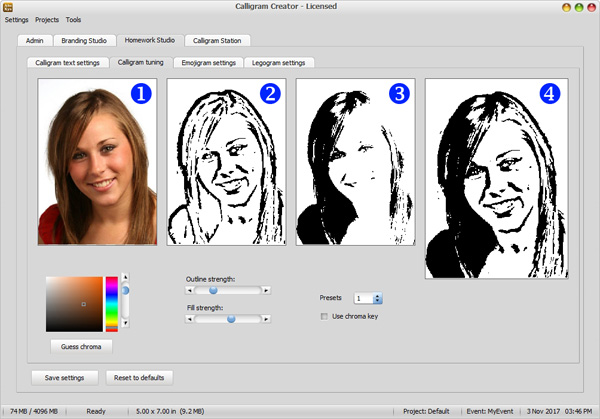
select the 'Homework Studio' tab, and then the sub-tab
'Calligram
tuning'. Here you see the same photograph
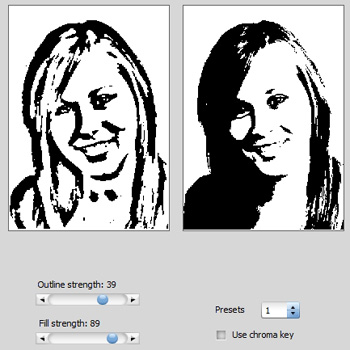
again, but also three other black and white pictures: From left
to right: 1. the original snapshot picture; 2. the outline of the face in the
snapshot; 3. the filling of the dark parts in the snapshot; and 4. the
composite picture, offered to the Calligram Station. The other controls at the bottom are
explained elsewhere in this help documentation. The black parts are the areas in which
text will be placed, the white parts are left white. This way
the Calligram gets into life.
There are two controls:
'Outline strength' and 'Fill strength'. Move any of these
sliders and see the effect of it. We have moved them to the
values that you see
in the picture below, thickening the outline, and adding more black (will be used for text placement) to the
Calligram source: Next, select the tab 'Calligram Station'. You are now back to the same
tab as after step 2, but also learned how to tweak the Calligram source file a
bit. Finally, press the 'Create Calligram' button on top. The Calligram creation has started.
This usually takes a few seconds in total. At the bottom you can see the
coloured progress bar, moving to its maximum value several times, indicating
the different steps to create the Calligram: After a few (5-10) seconds
your Calligram is ready. You should now see the following screen: In case
the 'DEMO" nag text is shown over the result,
it indicated that the user doesn't have a valid license file, or that
the current license has expired. Step 4: Sending the E-mail to the client's
address
One of the key
features of the application is to send the Calligram by e-mail (and print
the result). The pop-up window asking for the e-mail address is active by
default after installation. Like in step 2, let's see how this e-mail
functionality is set-up. For the moment, press the 'Cancel' button to close this pop-up input window.
Nothing will now be sent of course (the indicated dummy e-mail address has
not been checked
if
it actually exists....) Now press
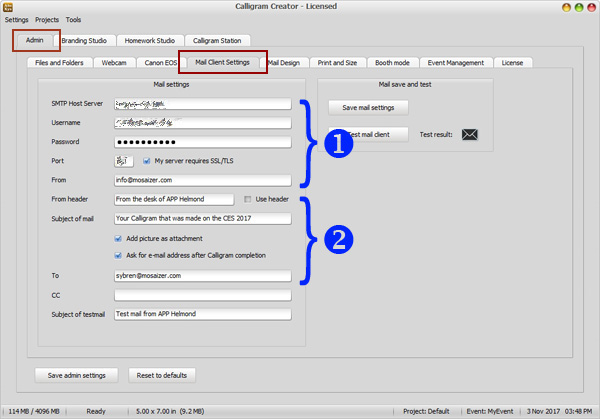
the 'Admin' tab again, and the sub-tab 'Mail client settings'. You will now see a dozen or so
parameters that are required to set-up your mail client settings: The data
marked as '1.' are the
mail client data of your mail account. These data are too specific to explain in
these steps. You should find the settings yourself, based on the details from
your e-mail provider. The data
marked as '2.'
are more specific data. For instance, the 'From header' replaces the e-mail address
text that the receiving person sees (usually the mail address
is shown, e.g. when hovering the mouse over the 'From' box in the mail application), and the subject of the
mail explain itself ('Subject of mail'). The
remaining text at the
bottom, and the
test button is used for testing the e-mail functionality, e.g. by sending
a test mail to yourself. When the e-mail test is successful the 'v' will
turn to green (or red if it failed). One of the
tick boxes 'Ask for e-mail address after Calligram
completion' is checked, so that's the reason you got the pop-up
window asking for the e-mail address. The 'Save
settings'
button
will save the current settings to a configuration file, and will be loaded when
you start the application a next time. Step 5:
printing the Calligram
When you switch back to the 'Calligram Station'
tab, you will find the 'Print Calligram' button.
When pressing this button, you are now asked in the usual way to select a
printer, and send the Calligram picture to that printer. The printer set-up
needs to be done off-line, and cannot be done from within the application
(except when you want to change the printer settings after pressing the
'Print Calligram'
button). Before
you click on the 'Print Calligram' button you need to
make sure the paper size, and the Calligram size matches. To see the current
Calligram size settings, you first select the 'Homework
Studio', and then the
'Calligram text settings' tab.
Here you the
most important setting that you should check before you print the Calligram:
the size of the Calligram picture. The size is indicated in
two different ways. The paper
size approach is the default, since this is the best option to assure that your
current paper tray in the printer is equal to the Calligram size. The paper size
is always shown in portrait, the application cannot print in landscape mode, and
the Calligrams will therefore always be made in a portrait
width:height
ratio. Now you know how to match the paper
size with the Calligram output size, so you're ready to print
your first Calligram! Step 6:
check the history and data log The final step is to check if
the data has been logged correctly. In case you wish to re-send the Calligram,
or re-print, or even re-finetune from the source snapshot photograph, here is
how you can do it. First
select the 'Admin' tab, then select the 'Event log' sub-tab.
You will now see two functional areas. The first one ('1') shows the basic data
of the event under which your Calligram was stored. The second one is an event
logger, showing all the relevant information during the Calligram creation
cycle. You can save the logger if you need (press the 'Save
activity log'
button), or clear the activity log.
Or keep it, and don't do anything. The number of Calligrams in
the current event is now also updated: 1. The
second action is to select the 'Print and
Size' tab in the 'Admin'
tab. This is what
you will find: The drop-down box ('1')
is used to select the event you'd like to filter out in the overview of
available Calligram results ('2'). Of course, this overview is still one picture in
size, since we've created only one Calligram yet. The information of the
currently selected Calligram is shown in the blue box, while the corresponding source
picture is shown on the right. The information is updated each time you click on a
Calligram picture in the overview.
There are two interesting features
active in this tab:
Basically, you can redo the entire Calligram action, tune, finetune, create,
print, etc, as if this was a new Calligram, based on a new snapshot. When
finished, this picture is added to the ready Calligrams, and added to the overview
as depicted above. Some confusion may
arise about which source picture is actually used for what Calligram, but it
surely doesn't outweigh the flexibility to redo any previously
made Calligram. Step 7:
understanding the data storage approach This is not necessarily a 'step',
but rather a conclusion of the quick start. Many data are stored on your hard
drive, and during en event you don't want to lose data or pictures. It would
be a shame when a client wants a second print, and you accidentally deleted the
source. Understanding the data storage
approach can best be explained by using the 'Files and
folders' sub-tab under the 'Admin' tab: Here you see several sources
of information. 'Load' means: load this picture as
the source photograph for the Calligram; 'select'
means: select a file for that feature; 'view' means: show
the current input file, and finally 'folder'
means: show me which folder is currently selected for the corresponding
function. On top you
find the 4 input files
for Calligram creation: the text file, the fonts list file (optional), the colour
profile file and the source photograph. In case a tethered camera or the webcam
is used, this file is replaced by the new snapshot picture. In fact, the picture
indicated in the above overview is only used for testing, to properly start and test its basic
functions. Below you find several
folders, the topic of this step 6. The following folders are important:
Finally,
two more files are important to mention: the 'Output picture
file' is the name of
the currently created Calligram. This
text is greyed out, since the name is automatically created using a
timestamp string format ('YYYYMMDD_HHMMSS'). The last file placeholder in this picture is
the mail client file. The default is 'MailClient.ini', but you can also use your own client data file,
and change this file entry in this tab to your own file. This is quite
convenient in case you wish to use different mail clients for sending the
Calligram. Note: you can
only delete the contents of the folders if you also delete the entries in the
'Calligram_Eventlog.xml' file (and only leave the
root entry intact, 3 lines in total!). But this highly discouraged to avoid read
and write errors during operation. In case you wish to clean up, you should
backup the entire folder 'C:\Users\Public\Documents\APP\Calligram Creator' and
re-install the application, overwriting all the
files, including the mail and application configuration
files. 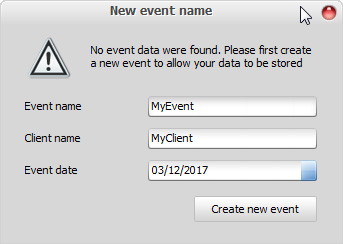


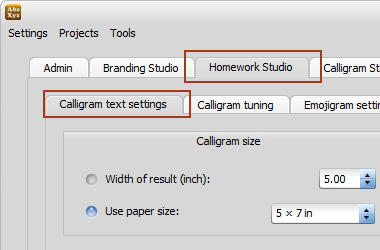
The first
is to indicate only the width (in inches, here: 5.00 inch), where
the height follows by matching the Calligram size relative to the
source snapshot photograph.
The
second approach is to indicate a paper size (the most current paper sizes are
predefined in the drop-down box, here: 5x7 inch). The Calligram output is
matched with the paper size width:height
ratio, possibly
cropping parts of the source photograph to allow a for a
paper size match. 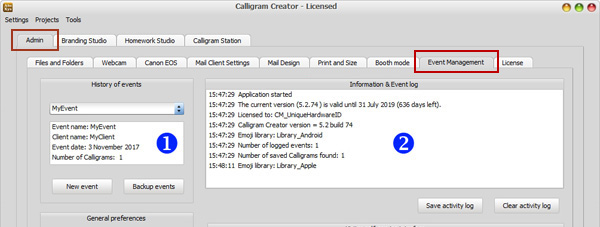
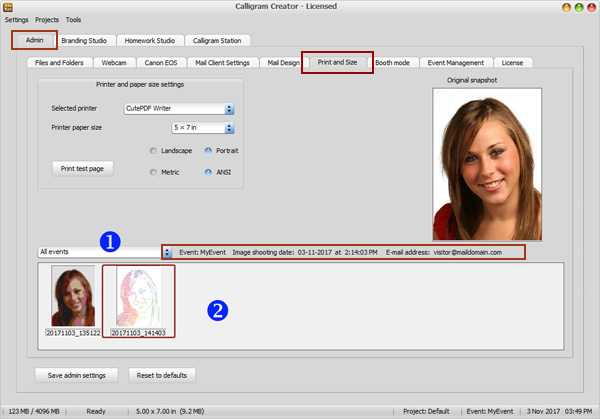
If you double-click on a Calligram picture it will
reload itself back into the Calligram Station. From there you can reprint the Calligram, or
resend it by e-mail.
If you double-click on
the source picture on the right, then that picture is reloaded into the application, like any
new snapshot. But this time you can adjust all the black and white parts
(as in step 2). 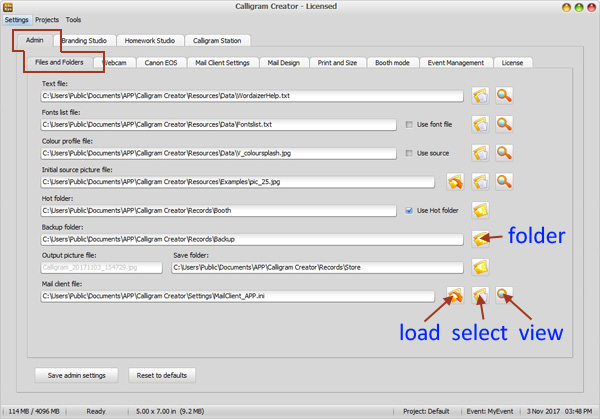
'Hot folder' = the folder that the
application actively listens to, and whenever a file is found (e.g. webcam,
tethered DSLR) the photograph is automatically loaded in the application, and
a black and white Calligram base is created. When the checkbox 'Use Hot folder' is unchecked the application will
not automatically create a Calligram black and white ('base')
picture. In that case, only when you have pressed the 'Load' button, and the indicated picture exists, the
Calligram base is created. The default is therefore 'Use
Hot folder'.
'Backup folder' = the
folder in which the snapshot picture is copied to from the Hot folder. In this
folder all the original photographs are stored. You should never delete any
file in this folder, since it's also required for reprints, and re-calligram
creation (e.g. step 5).
'Save folder' = the folder in which
all the ready made Calligrams are stored. Similar to the 'Backup folder'
, this is an application critical folder, and content of this folder
should never be deleted.