Brickaizer -
Help Brickaizer -
Help |
Brickaizer -
Help
Tutorial for Artkal Fusion Beads
In the 'Tutorial' chapter of 'Brickaizer' you will find a general description how
create great mosaics with beads. The help documentation for Brickaizer is found
here. In the current section you will find a dedicated
tutorial on how to effectively apply the rich colour palette of the highly
popular Artkal S-series, having nearly 160 different colours. The Brickaizer
application has 24 dedicated data/colour sets preinstalled. These datasets
correspond to the actual colour setas from Artkal. For instance, the set ARTKAL-C 15 Colorbox set CC15.xml is a set of 15 colours,
type C bead, where the set is identified as 'CC15 '
in Artkal terminology. Depending on the
type of beads
(A, S, or C) we have sets of 15, 24, 25, 28,
30, 36, 48 beads and a full set of colours (157 to 159), and a couple of grayscale sets
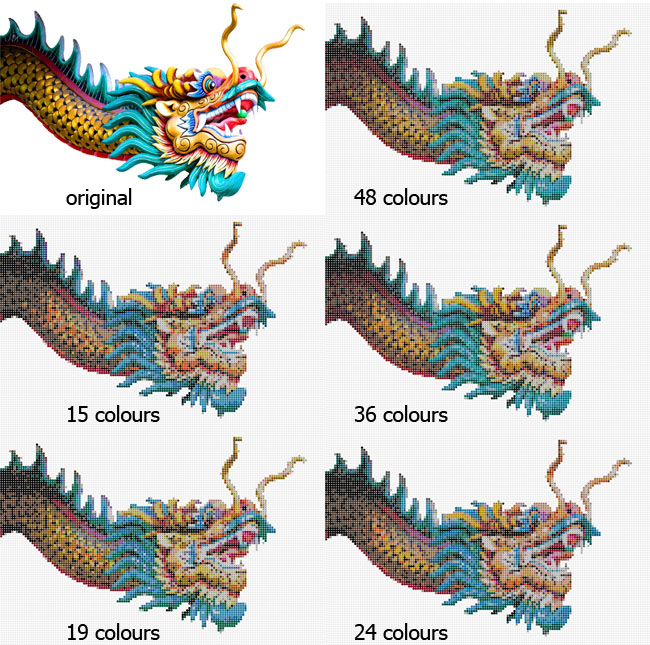
(12 and 13 shades of gray). Lesson 1: My first Artkal S-series Fusion Beads
mosaic
The Artkal series A, S and C come pre-installed, so you can very easily select
the Artkal S-series colour palette
via the menu 'Colour table' 'Open table'
and then select the most extensive
colour set 'ARTKAL-S 158 Solid Colorset SB1000-FS.xml' file. You
will now see the full palette on the right. For convenience we have also
placed all the colours in one image:
Image 1: Left the full colour palette of the 159
colours, Right: a visual impression of these colours in a YUV colour
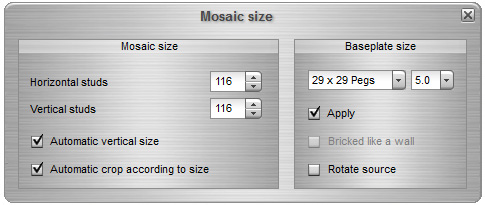
space. Now open the Mosaic size window by pressing the 'Mosaic size' button.
You will notice that also the base plates (called 'pegboard' for
beads enthusiasts) have also been adopted to match with the current boards for
bead mosaic creation. A second selection is now possible: the bead diameter (2.5,
2.6 and 5.0 mm). These values have no influence on the mosaic creation process,
but they do matter for the actual size of your mosaic. The size of the
mosaic is shown in the statusbar. The size of the peg board however is of
influence when you want to create building blueprints, one for each board. We will
select a standard square 29x29 peg board, and since the S-series is a 5 mm bead,
we will also select the 5.0 mm bead size. To make a quite large mosaic, we use 4 x 4 =
16 peg boards (so: 116 x 116 beads as the final size). Image 2: The size pop-up window, which is shows by
pressing the 'Mosaic size' button.
Once you have set the size, you can now create your
first beads mosaic: Image 3: The result from a first try using the 159
colour set. Lesson 2: Look at the cost, and amount
of beads used
At the
top of the resulting mosaic an estimation is given of the cost of the mosaic. In
this case appr. 47 euro. We have already included a general cost per bead
in the data set, being 0.35 cent per bead, or 35 euro per 1000 beads. Since this
mosaic consists of 116 x 116 =
13456 beads, so the maths
is quite easy: 13456 x 0.035 =
EUR 47.1 (appr. USD 55). Form the overview it's also clear that this
image requires 48 different colours. Since most large sets are sold with 15 to
48 colours, but not necessarily in the correct colours, we should analyse which
colours could easily be discarded and replaced by other, very similar colours.
This might simplify your colour palette stock keeping requirements considerably.
Let's now have a look at the amounts of beads used, press the 'Show amount'
button. This is what you can see: Image 4: The amounts per bead colour for a 48
different colours (multiple screenshots to show all of them). From this table you can see that although many colours
are very well used intensely, you could still see very similar
colours. For instance S109 and S110 are similar, S140 and S142 are also
similar, and also S18 and S155. Although these colours are actually different, their subtle colour
differences would not be needed here. So we can discard them
and try again, now with less colours. To make the exercise even more challenging, we
also discard colours S85 (like S146), S116 (like S118), S113 (like S78), S147
(like S119), S83 (like S41) and S159 (like S07), and some others. Then we run again.
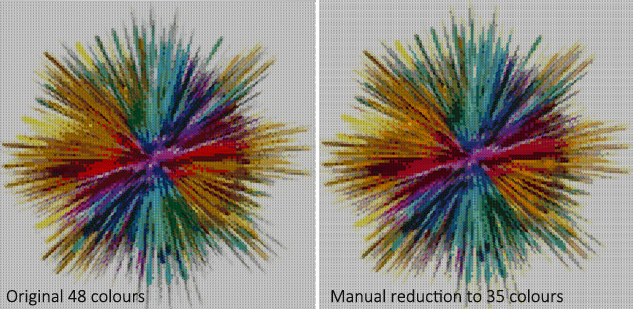
Now we have only 35 colours left, and the result is different, but only
marginally (and prone to personal taste). Picture below, left: the original 48
colours, right the same size and amount, but now with just 35 colours. Image 5: Left the original result from Image 3.
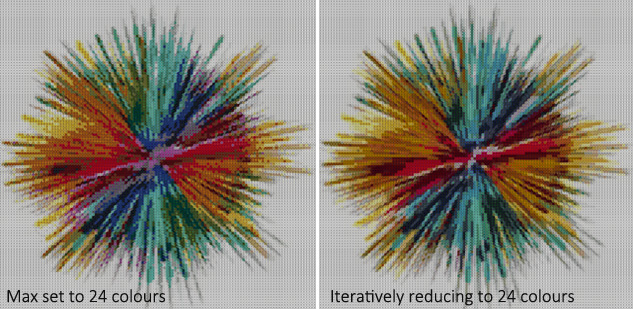
Right: the manual colour reduction to 35 colours. Another way of selecting less colours, is to set a
maximum to the amount of colours used. To set the maximum of colours you need to
press the Colour matching
button. On the left you now see 'Limit to # of colours' and 'Speed to
iterate to target'. Both will be used in this approach. In the image below we have
set the target amount of colours to 24. The left image was created by only
activating the 'Limit to # of colours' checked, where the application uses a smart algorithm to immediately reduce the colours (in this case down to 24 in
one step). In
the right image
you see the result where we also iterated down to 24, with a
slow speed (max 5 colours at the time, gradually reducing the colour reduction speed to one by one).
With each iteration the least used colour is replaced by an alternative colour. We counted 12
iterations, from 48 down to 24, and the result is quite good when comparing it
to the image on the left. It doesn't however have the brilliance of the discarded
outspoken colours when we use more colours in the mosaic (like the result
shown in Image 5). Image 6: Left the one-step colour reduction. Right:
the iterative colour reduction.
A third
approach to reducing colour is to use a special set of colours, e.g. from one of
the available sets of Artkal, e.g. the 'ARTKAL-S 24 Colorbox
Set CS24'
set. We have included the special colour sets as
well for
the 15, 24, 25, 36 and 48 colours that is provided by
Artkal. These
are conveniently
preinstalled. Below you see the results of 3 colour sets: 48, 36 and 24, and consider
yourself which result is the best, and what colour set you should select. The
48 and 36 colour sets were iterated down to 24 colours, while the 24 colour
set already
had a
maximum of 24 colours. In this example the size was reduced to 2x2 pegboards of 29
pegs each, so less than 3400 beads.
Image 7: Three different approaches to reducing the
amount of colours used.
Finally,
and although a different picture is
used, here we show a nice result with
the basic set of 'just' 15 colours.
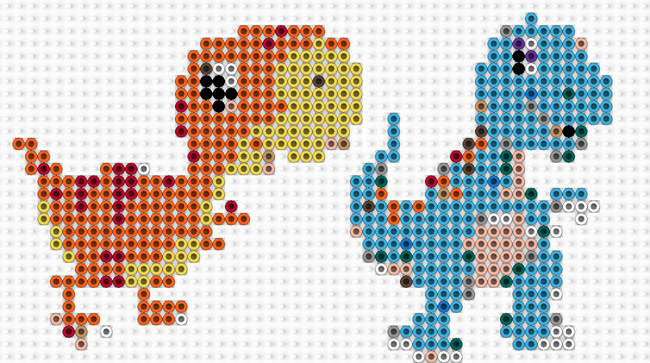
Image 8: Two simple images with juist a few colours
required. Although the mosaic is small, just 1x 29-peg board for
each dino, the amount of beads is almost sufficient for this nice image. Step
back 1 few meters and you'll clearly see the details of the dino (seems a little
odd by stepping away you see more, but that's how the brain works....it fills in
the rest of the image). It was made with the simplest of settings, and applying
the feature 'Use cartoon colours' set to maximum of
15) and 'Smart resize (keep sharp edges)' in the Preferences.
And that's basically it.
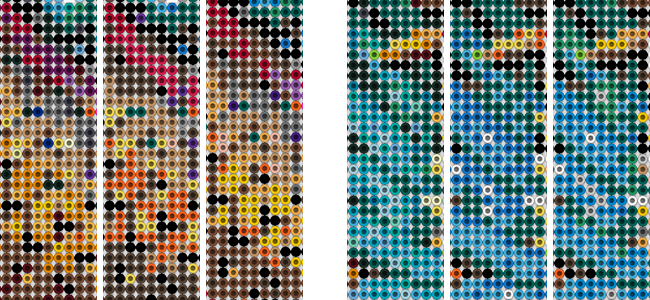
In the S-series Artkal offers several ready-made sets, ranging from 15 to 48
different colours.
These colours are subsets of the vast range of 160 colours, and are strategically selected,
to be used in as many colourful 'mosaics' as possible. In the following image we have arranged the colour sets for
you:
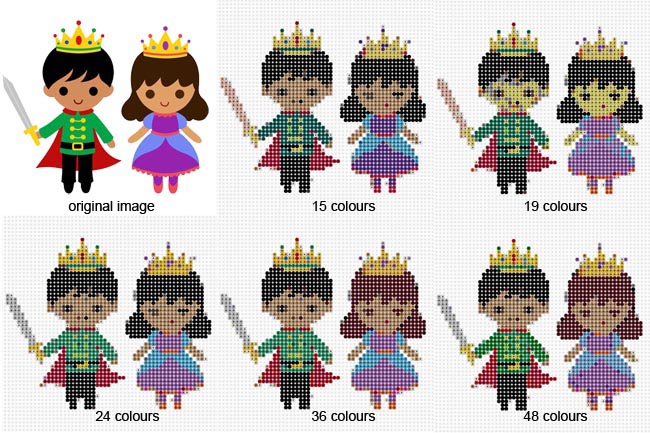
Image 9: Five differetn colour sets compared. Top to
bottom: 48, 36, 24, 19 and 15 colours. When you
apply these colours to a create, e.g. a cartoon image, these will be the results:
Image 10: Comparison of 5 different colour sets for
a simple cartoon image.
The original colours are extremely well
preserved. The 19-colour set however has a slightly different 'skin' colour. All the other sets can very
well follow the colourful image. To test a more challenging image, we will now use a colourful image, with many subtle
tones.
Image 11: Comparison of 5 different colour
sets for a complex multi-colour image, with subtle shades and colours.
As we can expect, the 48 colour set is now more fitting,
and the 15 and 19 somewhat fall short of the subtle colour tones. At first sight all
sets perform pretty good, but when looking closely you can see the superioity of
the 48 colour set over e.g. the 15 and even the 24 colour set. See below for
some apparent detail differences.
Image 12: Comparison of a colour
sensitive area, shows with 36, 48 and 15 colours (Left to Right).
In both examples the rich palette of
48 colours provides a better true colour, recognized by the subtle tonal differences. The
reds and blues are less well represented by the 15, and also by the 24, though
the overall impression of 24 is still quite good. The resulting image has
all 48 colours used, where the pastel tints make
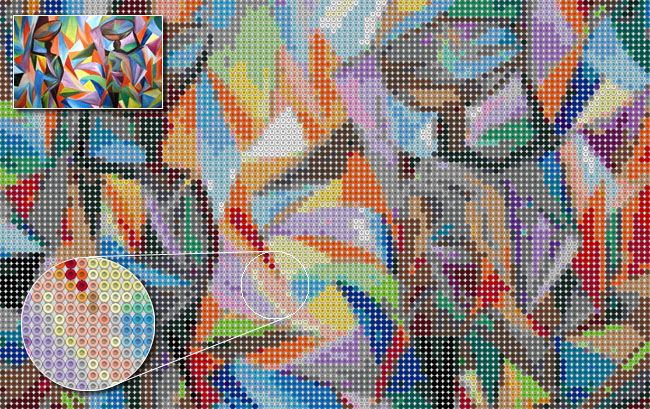
up about 25% of the total! As an impressive example of the soft colours of the 48
set we finally show how a truly challenging image can still be made with these
colours:
Image 13: The mosaic of a truly challenging image,
where many different hue, saturation and lighness aspects are found.
It's however always a matter of taste, what kind of image you like best, and what you can afford
to buy. The cost of the dragon image above is appr. 24 euro, 5170 beads are required,
about half the amount of the 48 colour set (having appr. 11100 pieces), and
considered to be a moderate cost, but excluding the cost of 8 pegboards (or one
pegboard, used 8 times).
Lesson 4: Creating transparent sources In many
cases you will start with a 'normal' source image, i.e. an image with no
transparency. A typical image is saved in the JPEG or JPG file format. These
formats, like other 24-bit BMP formats, do not have a transparency channel
(only, R-G-B channels). Another file format is PNG, which can contain a
transparency channel. In addition, shaped fusion beads are preferred my
many bead mosaic creators. Also shaped beads typically are created for
children, by children. For instance, a funny cartoon figure as a source should lead to a cartoon bead image only, excluding the
background.
In this
lesson we will demonstrate how we can use transparent sources (already at start,
e.g. a PNG image) and how to create a new transparent image using Brickaizer
(from a JPG image). We will start with the most common situation: we have
an image that is not transparent. In lesson 5 we demonstrate how to work with
transparent sources. You find the transparency controls via the main menu 'Special functions' > 'Colour filters', the middle section
('Filters') has the
transparency controls at the bottom. To open the dedicated transparency panel,
click on the white box on the right. This white box represents your selected chroma-key (or: pixel that must be made
transparent). Image 14: The controls for
defining transparency are found in the 'Colour filters'
control panel.
We have found a cute dinosaur image on the internet,
which
we will use for creating a nice (evenly cute) fusion bead
result. The 4 images below show the four steps we
are taking to create a perfectly balanced cut-out of the background colour. The
required 4 steps are explained below.
Image 15: The four steps showing how to create
transparent parts in a non-transparent image. Step 1.
Click with
the colour-picker (now showing when you move your mouse over the left - original
- image) on the colour you would like to make transparent. We selected of course
any white pixel. The result is immediate: the image on the right is now made
transparent where all pixels of that colour are made transparent. You can see
the transparency as the gray background. The lower slider'Background' can be used to select your background
colour from white to black (gray is the default). This is a very convenient way
to see the effect of transparency. Step 2. Although at
first sight the transparency seems ok, it's actually not so good. When looking
at the (blue) edges of the dino, it appears to be rough and pixelated. So,
we need to expand the bandwidth of the pixels that have the colour for
transparency. Conveniently, the two sliders,
'Tolerance' and'Feather' can help to finetune the transparent
parts. We increase the tolerance just a bit, and if this helps we don't need
to use the
'Feather'
slider. In some cases also the feather is required: it smoothes the edges of the
transparency, and also it creates a small bandwidth area where the transparency
starts from fully transparent to fully opaque: the larger the feather value the
wider this transition band will become. Therefore'Feather' is our last resort. We simply increase the
'Tolerance' until the edges are smoothed out. When
nothing really works well, you need to improve the quality of the source image
outside Brickaizer. The application only offers a few effective yet simple tools,
that cannot match with the precise (professional) options
of e.g. Paint.NET or Photoshop.
Step 3. When taking a
closer look, you can see that also the white parts from the eyes also have become
transparent. The way the transparency works is that is takes all
the
pixels of the selected transparent colour (this approach is also knows as
'chroma-keying'). To exclude the eyes from taking part in the transparency,
you need to select an area where the pixels are not affected by the transparency
step. Now you have to use your mouse again, and click on the image on the
right to create the area that must be excluded from chroma-keying. You need to
click several times, shaping a kind of circle within the head. With every click
a new line will be created, and by double-clicking the last clicked point is
connected with the first point. Now the exclusion area is closed. In the
image of step 3 you can see we have only selected an area in the head of the
cute dino. All other parts are ok.Tip: to select multiple
areas: you can add to the previous areas by pressing the SHIFT key
while creating a next area. After double-clicking the areas are now all shown (keep
the SHIFT key pressed until you are done!). The exclusion area is very
well visible as the dotted line in the head area.
Step 4. When you are done, then again click in the
picture on the left, to select the transparency pixel (we select any white pixel
again). Now your selection on the right is inverted,
where all the pixels are selected
except the pixels that you just outlined.
As you can see the white parts of the eyes are now correctly kept white, since
these are excluded from the chroma-keying action. Finally, press the 'Done' button, to bring you back to the previous window.
Now tick the 'Apply transparency'
checkbox, and create your (partly) transparent mosaic.
The final mosaic
is shown below. As you can see: the eyes are part of the bead mosaic, while
the white background outside the cute dino was omitted from the resulting
mosaic. The inset shows
the pegboard, demonstrating that these outside parts indeed have no beads,
and is therefore a direct result of the transparency steps.
Image 16: The result of the transparency step above.
Clearly demonstrated: no pixels in the white parts, except for the
eyes. The inset
shows the pegboard, demonstrating that these outside parts indeed have no
beads, and is therefore a direct result of the transparency
steps. 


![]()
![]()
![]()
Lesson 5: Using transparent sources
In
lesson 4 you were shown how to create
transparency from non-transparent source image. Here will will use an already transparent source image.
We will show two kinds of image: a properly saved image with
the correct transparency channel, and an example where the transparency is basically
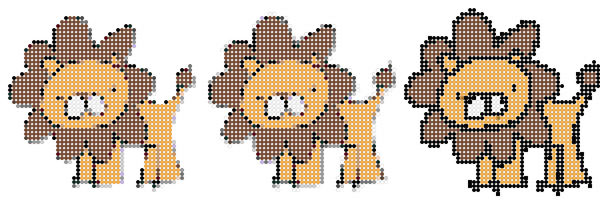
not very well saved. We found a cute image
of a lion, with just 4 colours: white, black, brown and
ochre. It is an PNG image, where the outer area was already transparent. We did three tests, and created a 50-peg
image: In the image below you can see the results. The second
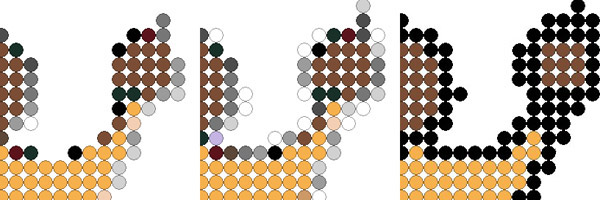
image (#18) shows details of the bead mosaic. Image 17: The result of the three approaches. From
left to right: #1, #2 and #3. Image 18: Details of the
lion's tail, from each of the three approaches. From left to right: #1, #2
and #3.
Although not so very well showing in Image 17, the transparent area
is not so sharp. The edge seems to
have many gray and even white beads, as if the transparency faded from fully
transparent to fully opague. As a consequence the beads are slightly coloured,
and are showing in the image in the middle. By better removing
these semi-transparent pixels, we can already improve a lot
(less white beads in the left image). But by thickening the
black cartoon lines, we even achieved one-bead-wide lines, and thicker at places. The result on the right is clearly much better and
pronounced. So, although Brickaizer can remove some
transparent pixels, it's not an image editor, and the enthusiastic beads artist
should perhaps prework the source image, to avoid stray beads at places where it's
not wanted. Simple pre-editing can however be very effective with
transparent sources. This lion just has 4 colours, so we also excluded stray
colours, leaving only the 4 key colours in the palette. This way also
stray beads/colours can effectively be avoided. A last step was made by also
recolouring some beads in the editor ('The Builder'). Lesson 6: Using Artkal beads
for human portraits
Many bead artists are looking for the correct colours to
create human portraits. The challenge is always the colour
of the skin, and to avoid colour patches of equal colour. We
will demonstrate how to effectively apply the most extensive colour set of fusion beads
from Artkal how to make very good human portarit bead
artwork. We will also demonstrate how to effectively reduce the number of colours
to still get a very good impression on a human portrait. Finally, we
will show how to create a portrait with a range of hues,
instead of true colours or black and white. The start of every human bead artistry is a good image.
Images with blueish teints, or wrong light (e.g. too much sunset-red or purple),
and also images that were made with a flash are usually not suitable. Images
with very little contrast (too dark, too light) are usually not suitable, nor
are images with too much background 'noise' (e.g. a plant behind the person, or
a building, or similar colourful or rich of contrast). However, it's a
matter of taste, and we leave it up to the artist to make a good choice. The
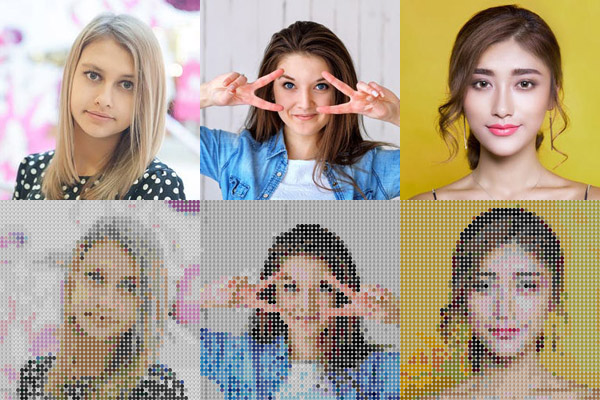
images that we use in this lesson were taken from https://www.pexels.com/search/people, where each of these images
are offered in the Creative Common license. Quote: "It's hard to understand complex licenses
that is why all photos on Pexels are licensed under the Creative Commons
Zero (CC0) license. This means the pictures are completely free to be
used for any legal purpose. The only restriction is that identifiable people may not appear in a bad
light or in a way that they may find offensive, unless they give their consent.
You should also make sure the depicted content (people, logos, private property,
etc.) is suitable for your application and doesn't infringe any
rights." Image 19: Six examples of different images of people,
on a 50x50 pegboard, 48 colours set.
From the six examples above, it is clear that creating a
portrait from an image, by just pressing the 'Create' button leads
to quite
different results. The skin colour is very different in these
images, as is the overall colour and saturation, teint and lightness. Also backgrounds
are quite different, ranging from dark gray, to brightly coloured and even 'things',
like a flower wall. From these images it is clearly demonstrated that
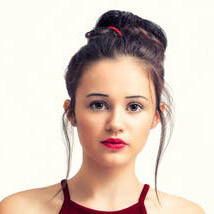
creating a person with beads, requires some preparation. Image 20: Studio quality image for next staps
We will show how to create a good looking beads portrait
by using studio quality image (image
20). The source size is just 214 x 214 pixels (!),
big enough for a 145x145 bead artwork. The examples in image 19 above are 50x50
beads, as a comparison, we will continue with a 145x145 beads size (roughly 72.5
cm x 72.5 cm physical size for 5 mm beads). Both
images are created first, as a good comparison
of the above bead artistry quality (image 21). Image 21: A basic beads mosaic ('just press the
Create button'). Left 50x50 beads. Right 145x145 beads, in 54 colours.
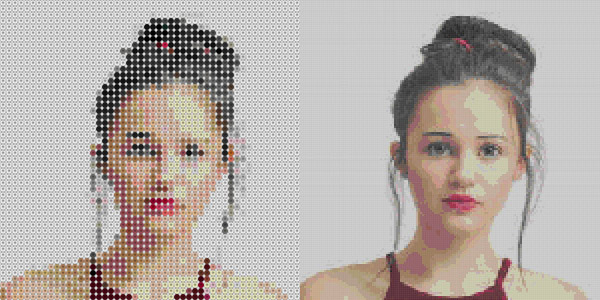
The first thing we'd like to set is the dithering. This
is a well-known technique to reduce the number of colours by blending pixels in
the image in such a way that with a limited amount of colours a wide gamut of
colour impression is created. Very much like an inkjet printer, that is using
only 4 or 8 colour toners for photo quality prints. We show two results:
the one after we only changed the 'Colour engine' to
'Colour dithered' (found in the 'Colour setting' panel), while the selected colours from
the right image 21 were still active. The second time we also reset
the entire colour selection, so all 158 colours
could be chosen in the process of dithering. Image 22: Left: only change the dithering method
(preselection of colours still active). Right: fresh new mosaic with
dithering.
The difference is
almost invisible. The image on the left has 54 colours,
on the right has 67. The 54 colours were preselected from our previous run,
so apparently when all colours become available, 13 colours more will be used.
This simple trick of first use normal colour selection,
and then only add dithering, is a nice
way to start an initial colour reduction step.
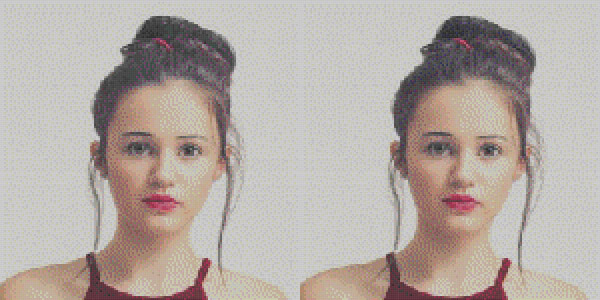
We will now start reducing the amount of colours. We
start by setting a maximum value to the number of colours: 36. This is done via
the 'Colour setting' panel, where the value to the
now checked box 'Limit to # of colours' is set
to 36. Then we also increased the minimum amount of beads, as a percentage of
the total: 0.5%
(in this case 112 beads as a minimum
amount). Both results are shown in image 23. Image 23: Left: set the colour amount to 36. Right:
also set the minimum amount of beads to 0.5% (= 112 beads).
The difference is clearly visible: the reds of the
mouth have disappeared (not enough beads required), but instead the overal teint
has been subtly changed to a nice hue (that is: we liked it). Although we have
drifted from the ideal colours, we found inspiration of changing
the overall colour of the image, without changing
so much of the person's identity and radiance.
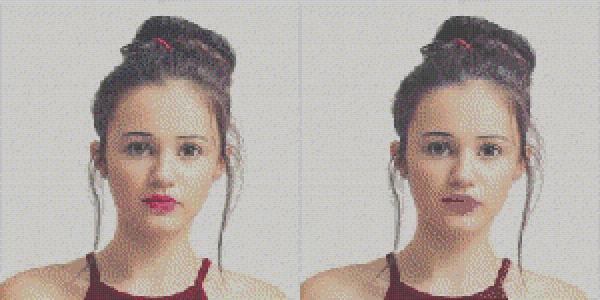
A next logical step is to further reduce the number of colours. We
use the same settings as in the last used (image 23, right), but now we
set the maximum amount of colours to 24 (was 36). The result is an even blander
result (less hue, less contrast, less outspoken features). To repair the
'damage' done, we do a final test by increasing the contrast, and increasing the
saturation of the source image: +5 and +7 (this is done via the main menu 'Special functions' > 'Colour
filters'). Below you see the results. Image 24: Left: set the colour amount to 24. Right:
also increase contrast and saturation (+5 and +7).
Also the reds are back again, the mouth is a blurry red,
less subtle. This can be repaired by using less saturation or contrast, or
correcting it in the 'Builder', but we choose to stop here,
and follow a different route: applying a hue. Since the image has nice
sepia tones, we put all settings back to normal, except the colour dither
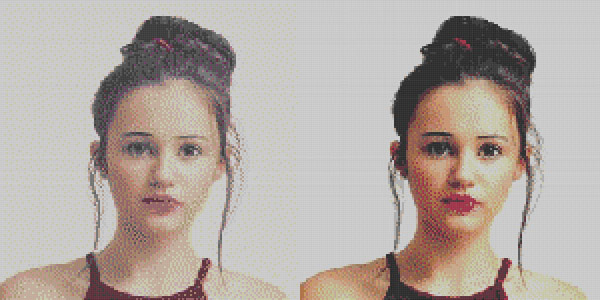
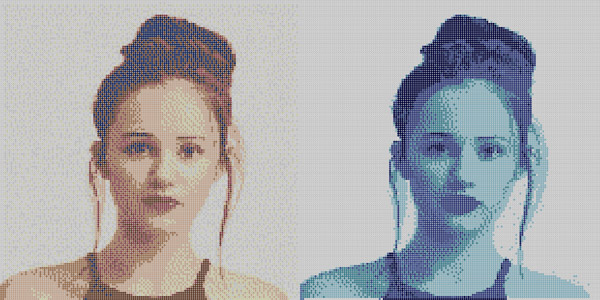
(almost a must for portrait mosaic). Then we activated the 'Use cartoon colours', set to a value of 8. A very nice
result was found, where sepia tones are showing a rich palette of colours. A
final test was done to create a different hue: blueish tones. We used the colour
sorting feature (also part of the 'Colour matching' panel), and sorted the dataset on
'Hue'. Since many colours were already 'off', we unchecked all
colours, except the blue tones (S105 - S137, after sorting). Then we increased
the contrast slightly (+2, to assure a white background) and created the mosaic. The result
is very nice:
Image 24: Left: use cartoon colours active, 8
colours. Right: only blue tones, with extra contrast of +2.
It's a matter of taste to like these portraits. However,
we hoped to have provided some examples how to effectively create good looking
portraits, and how to play with the colour tones. Perhaps one last word of
advice: start small, like 150 beads as a max size, and when
you have found the perfect colour balance, first save your
data in a project, and thèn increase the size. From there you have a
perfect starting point to further tweak the end result.
We edited the as-is image, and refined the
transparent area by erasing the left-over pixels outside the lion's black
cartoon-esque outer lines.We used the as-is image, without any
editing.
We selected the black lines of the as-is image, and created a much
thicker line, using the selection expansion tool in Photoshop.